From Teacher Directed to Student Directed Learning


As a new teacher or a teacher with many years experience, you hear about the importance of planning for student-directed learning in the classroom. Keeping this approach in mind as you plan in all subject areas benefits student learning and also benefits the teacher. Benefits include:

  • Engaged students – most students want the opportunity to talk as they learn, not just listen. When made to only listen, they look for distractions and classroom management issues often arise. If students are provided time to collaborate on a topic that interests them, they are engaged in the process and positive learning outcomes are the result.
  • Student interest – this leads to the content. Provide students with choice and select topics within the curriculum expectations that are of interest to your group of students. Students will demonstrate more initiative and take more responsibility for their own learning if they have choice of relevant topics. For example, in my grade 6/7 class, I modelled writing a monologue from the perspective of a character. Then, the students were all provided with a rubric to create their own dramatic monologue based on a character of their choice from a book from their choice.
  • Differentiated instruction – allowing choice of topic or type of presentation/project differentiates for the range of learners. Again, as an example from the monologue assignment, struggling readers selected books like Diary of a Wimpy Kid, while others selected more challenging texts like Journey to Jo’burg. Similarly, students will select an option for a project on what they are comfortable with (creating a slideshow vs. a video). By allowing students choice, you are more inclusive, not lowering your expectations for those who can surpass them, or challenging your lower level students to frustration. And as a result, the students who select the more accessible choice, often learn from the students who are demonstrating success with a more challenging topic or type of presentation.
  • Assessment – student-directed learning allows time for ongoing assessment. I have spoken to teachers who plan detailed lessons and present to the class in a lecture style format with little time for collaboration or independent research. These teachers lament that student’s aren’t “listening” enough. They also wait until the end of unit to assess students with a paper/pencil task. By facilitating students in a more self-directed approach, teachers can support student where they are at with resources and mini-lessons for those who need it. Why provide the same lesson to the whole class if they do not all need it? When students are working in small groups or pairs, or even independently, the teacher is provided the time to interact with students, find out where they are in their understanding and provide the necessary support (assessment for learning).
Student-directed learning isn’t students learning on their own. It is more like students learning within a framework set up by the teacher, and supported by the teacher. It benefits all those involved!


Photo of Mike Beetham

Divide and Succeed

One of the biggest concerns a teacher is faced with is the number of students they have to work with and thus the needs to be met in their classroom. Amongst that class of students will likely be special need students from both an academic and/or behavioural need, students who work very quickly and students who need extra time to consolidate their learning, students working below grade level, at grade level and above grade level. The class profile has a direct impact on the teacher’s plan of action. A successful strategy that has allowed me to ensure that I have direct, 1:1 contact with every student is a divide and succeed.

What I do is to start with a two week cycle (10) school days. I then look at my class number (I will use 30 for a working example) and divide that group into 5 groups. Thus I will end up with 6 students in each group. Each group will be assigned a conference day. Group 1 will get Mondays, Group 2 will get Tuesdays and so on. I then divide those 6 students into 2 groups of 3. Student A, B and C in Monday’s group will meet with me on week 1. Students D, E and F will meet with me on week 2. That means that during each academic day I have to build in time to meet with 3 students. That is a doable strategy. The end result is that I get to meet 1:1 with each student at least once every two weeks. What occurs during that quality time is up to you. I currently use it to conference on reading, writing and personal check-ins.

As I get more efficient in my conferencing and pinpoint exactly what I want to check up on, assess or discuss I am able to move it to a 1 week cycle where I now meet with 6 students a day. At this point I know my students very well and know which students need more conference time and which students need less time. There are many ways to revise this strategy such as when week 1 is used to conference with all students and week 2 is used for necessary follow-ups or teaching students to lead their own conference. There is no interrupting (unless an emergency) during a conference. The class has built in peer supported strategies when the teacher is in a conference. All of the above require routines that need to be taught to the class. This time serves me so effectively when reporting times arrive as I know so much more about my students.

Photo of Mike Beetham

Shifting to Assessment As Learning

How did I do teacher? Did I do it right? Is this what I am supposed to do?  These are the questions that I have heard over and over my entire career. I began to wonder why is it that my students always need to have me tell them how they are doing. As my understanding of good assessment practices evolved, so did my understanding of assessment as learning. This is the ultimate goal of what effective assessment practice strives to create in learners.

Once students not only know what they are doing, but what a successful product looks like (success criteria), they shift from teacher focussed to student directed. At first my practice consisted of the criteria being established by me and then shared with my students. As I continued to enhance my understanding of effective assessment practice (Damian Cooper – Talk About Assessment 2006) I began to experiment with student created criteria. Lo and behold, not only did my students get it, they now owned it and the task became contextually valid to them.

My current pedagogy that I am phasing into my practice is a daily debrief on the day’s learning. I will often use it at our final circle time of the day, journal writing or individual conferencing. The following questions are my guide:

What did you learn today?                 How do you know you learned it?

How well did you learn it?                  What helped you learn it?

What did you find difficult to learn today?                     Why?

What could you do tomorrow to make it easier to learn?

Where can you use what you learned today?

I usually choose two questions and focus on a specific area. What did you learn in mathematics today? I am very happy with the beginning results I am obtaining. I have just recently started to take a few notes from the discussion and remind students the following day so that they can use their own feedback to assist with the new day’s learning.

If you have any other prompts or guiding questions that you use, please post them for other to use.  

Photo of Mike Beetham

But Why? Part 2

Why I have chosen a video? Why I have allowed them to work in groups? Why am I allowing my students to have choice in their learning?  Why have I assigned homework? This is the question I start with for every instructional unit (and in practice, every classroom decision that I make). Why am I doing what I am doing? What is my desired learning outcome? How will it move my student’s learning forward?

My change to using a backward planning model has been one of the most significant improvements to my teaching practice. I now start all of my instructional planning with the following question:

What do I want my students to know, be able to do and value at the end of this instructional unit?

 Of course my answer always starts with the Ontario Curriculum and the overall expectations of that subject area. The next phase on my planning is where I try to visualize what does that learning look like in the life of a 10 year old (or 15 year old or 7 year old etc…). I try to find the context for the learning so that it becomes real for my students. That context increases the level of engagement, which in turn bolsters the intake of learning.

A caution I always have to remind myself of is that I am viewing the learning tasks and content through an adult focussed brain. To be more effective I have to train myself to screen my teaching through the developmental age of my students. When you know why you are teaching something, the actual teaching becomes so much easier.

Reporting Time


It is that time again, or maybe the first time for you – writing reports. It seems to loom over us as the due date for reports approaches. Yet, it isn’t always as insurmountable as it seems. Here are some tips for assessing, organizing, and preparing reports:

  • Create at-a-glance observation pages. These can be created in a grid or a list. Organize students in boxes or lists alphabetically by first name only. Print the observation sheets in a different colour than white, and put about 10 copies on 3 to 4 clipboards. Now they are handy to pick up and record what you notice, hear, see, throughout the day. If you prefer, you can title them to focus your observations, such as Learning Skills or Math skills. When writing reports it is easy to flip through a pile, looking at the same location on each page for anecdotal notes or examples to include in your reports.
  • Self-assessment. Provide time and guidance for student’s to self-assess particular work or their learning skills. It also beneficial to work on goal-setting and reflect on their goals prior to the end of each reporting period. These self-assessments can be useful when writing about their learning skill development.
  • Take photos. Using a smart phone or iPad to take many photos throughout the day can be valuable when writing reports (there are also apps for documenting student work, such as ThreeRing or Sesame). Often, you see students collaborating or participating in photos that you may not have realized during the activity. This happened for me when we had a guest dance instructor in the classroom. I took video and photos throughout the workshop. When I reviewed the video before writing reports I was surprised to see that the students I considered reluctant in dance, were actually dancing!
  • Record marks and brief comments. When I record marks in my assessment binder, I also add a brief comment. For example, after recording the students’ marks for a math test, I add a brief comment such as “doesn’t understand concept (knowledge)” or “needs work on communicating ideas” or “learning to apply…”. Then, when it comes time to write a comment for math in the reports, I have a quick reference that I can use to personalize the comment and the next steps for learning.
  • Maintain student portfolios. Use a crate or plastic bin for files. Make one folder for student and file all tests and work samples. Refer to the file when writing reports to have specific pieces as examples. Then return work to students and start anew for the next assessment period.
  • Build comments. Build subject specific or learning skill comments using brackets or *** to be filled in with comments and examples that are unique to each student. Cutting and pasting the same comment using only modifiers forces students to fit into a high, medium, or low category that may not best represent them.
  • Prepare for interviews. Before parent interviews, review the reports and jot down a few strengths and needs in a notebook (I organize one page per student) to guide your discussion. Then, make notes regarding any comments or concerns the parent offers, as well as any follow-up accommodations or communications you need to do. Then, you have these notes to refer to in any meetings that follow or for your next reporting period.
Finding your own routine of organizing and preparing for report, will help to ease the stress that report writing often brings.


Photo of Tammy Axt

Creating Criteria With Students

Allowing students to have input on criteria for an assignment helps them gain a clearer picture in their mind of what they need to do in order to be successful at a task. Although creating criteria together for every task would be ideal, time usually plays a large factor in making this difficult, especially for planning time teachers. As a planning time teacher, you often see the students for around 30-40 minutes at a time once or twice a week.

Today I want to show you a very quick way (under five minutes) to create criteria with students.

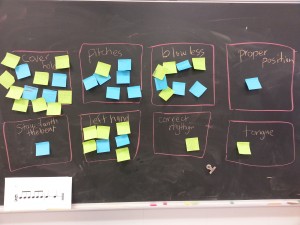
My grade four classes are currently studying the recorder. They are about three weeks into learning this instrument and are now learning a few songs to present next month. In preparation for the assessment and evaluation for their upcoming songs, I wanted them to help create the criteria. I handed out a sticky note to every student when they entered the class. Their job was to write down one thing that they think a person would need to do to be successful at playing a song on the recorder. After about two minutes, I had some students start to share their ideas with the class and we started to listen for some patterns and began to categorize their ideas. Students had active discussions and came up with eight different criteria that they should be assessed on at this point in their learning. The criteria will change as we learn new pieces of music and gain confidence with our basic skills.

The students will all have a copy of the criteria in their duo tangs and I will give them feedback regularly on this sheet as we are working towards improving our skills.

Taking five minutes to create some assessment categories not only gave them a set of very specific skills required to be successful, but also gave me a lot of information. As you can see from the picture below, the amount of students who wrote “cover the holes”, “blow less”, “finger or play the pitches correctly”, “put the left hand on top” far outweighed tonguing or correct rhythm. I can use this information for planning my upcoming mini lessons.

In addition, over the next couple of weeks, I will also be using two or three minutes per class where one student gets to be the teacher and we will practice assessing each other using the criteria. I will play some pieces on the recorder and have the pretend teacher give me some very specific feedback according to the criteria. In just a few classes, the students’ ability to give feedback to each other will drastically improve and this will create an environment where there are multiple experts in the class and everyone can help each other.

Overheard in my Ontario Classroom…

As my family comes from the province of Prince Edward Island, I grew up participating in kitchen parties. I have been inviting my grade five students to participate in kitchen parties with me including some very rowdy versions of I’se the B’y. To demonstrate a true kitchen party, I have been using spoons, foot stomping, piano, pots and pans and basically anything I can to make the songs lively. I was singing joyfully the other day and instead of singing “I’se the B’y that builds the boat”. I sang “I’se the B’y that kills the boat.” Some of the students paused what they were doing with confused looks on their faces and finally one boy raised his hand and asked “Miss. Gallant, do you have something against this boat?” I had no idea I had even sang those lyrics.
Sometimes students are paying closer attention than you are.

Photo of Samantha Perrin

Feedback in the Shape of a Tree

     Providing effective and timely feedback to students is a constant goal for a teacher, particularly when there seems to be so little time during the day. With a crew of 20+ students, it can be a challenge to find the time to sit down with each student and explain spelling and various goals targeted in writing. Often, we get really good at correcting the same errors over and over again without very much evidence of growth or improvement on the students’ part.
     For my grade 3 students, I like to use a quick and effective feedback tool someone shared with me long ago. It is fast, effective and easy for primary students to recognize and utilize.
     Here’s what I do on written work which has been either hand written or typed on the computer; as I read, I underline or circle common spelling errors or errors in syntax such as forgotten capital letters or periods. When I have finished reading the text, I choose a few spelling mistakes or goals that may be missing and write them, correctly, in a list on a corner of the student’s work. Any more than 2 – 4 items in the list can be overwhelming for a student, so I keep it short. Then, I draw a tree around the words so these corrections represent the area of growth for the student. On the page beside the tree, I make sure to write a response or a positive comment such as; “Good details!” or “great ideas!”, etc. When students write the next time, they can conveniently flip through preceeding pages in their journal to check the words in the trees.

Using this feedback strategy, students have a concrete example of how they can improve the content and syntax of their written work, and each time they write in their journal, they have a mini dictionary of some of the words or tips they can easily refer to. A tree is a simple, friendly image to use to offer student-specific feedback. I have found that this strategy encourages students to proofread their work before they submit it, helps  the ‘unlearning’ of some fossilized errors, and sets small, attainable goals for students to improve their writing.

Photo of Mike Beetham

But Why?

This is a term that has become a part of my teaching repertoire since spending the last four summers working with teachers in Sierra Leone, Africa. There are two ways that I make use of this valuable term in my classroom practice.

The first is when I am dealing with classroom management concerns in my classroom. There are always students who are not following the expectations, not fulfilling the work requirements, not complying to the adults etc… The fact is that most teachers are only able to deal with the behaviour piece (tip of the iceberg). The question ‘But Why?’ forces me to look beyond the behaviour, beyond the part that negatively affects the classroom routine and to seek out the roots of the behaviour. If I can make the time to figure out why something is occurring, I have a much better chance to support a change that will be permanent.

For example, student X  in my class last year had a reputation for refusing to do his work. It did not matter whether it was numeracy or literacy he usually behaved in such a way that the teacher had to finally intervene and remove the student for the good of the rest of the class. So, student X had developed a very effective strategy of avoiding areas that he did not want to take part in. The removal from the class was actually a reward for him even though in the eyes of everyone else it was a punishment.

I had to try and figure out the ‘Why?’ for his behaviour. This took time, patience and most importantly a good relationship. The end result was that he had significant gaps in his learning due to his behaviour choices and that future testing revealed that he had a learning disability in writing. As a result, he had learned that compared to everyone else he was dumb when it came to being able to express himself in written form. The removal from a class (adult punishment) was not as negative as the inadequate feeling he had everyday in school when required to write with his peers.

The solution became the need for differentiated instruction and differentiated assessment in order to allow student X the most effective way to demonstrate his learning. He still had to write, but only when writing was being assessed. In numeracy I only assessed his understanding of numerical concepts and not his writing skills. Scribing, models, oral explanations allowed him to both gain confidence in his actual abilities and not have to focus on his area of need.

Stay tuned for Part 2 of “But Why?”.

Photo of Erin G

Le passé c’est brassé – Bring the Passé Composé to Life (Part 2)

               An important lesson that I’ve learned this year is have the students write in a concise manner. In the following assignment, La journée de …, students must basically incorporate most of the major things we covered in approximately 10 sentences (passé composé with avoir/être, singulier/pluriel, compound sentences and adverbs). Originally in past years, I used to do a similar project entitled “Une semaine dans la vie de …” which involved them describing the week in the life of someone using the same requirements but was more than double in length. With my senior classes, I’ve been focusing more on quality rather than quantity by teaching them how to expand and elaborate on simple ideas. Again, the shorter length requirement is more feasible for reluctant FSL writers but showing all your students how to achieve more complexity allows your more advanced students to still be challenged. I’ve attached the project guidelines and reference sheets for you to view. Hopefully, it might be useful for an end of the year assignment.

la journee de project guidelines

Les activités possibles – au passe


Photo of Mike Beetham

Time To Smell The Roses

As the year now shifts to the final months of academia, it is important to take the time and reflect on the growth of yourself as a teacher, the academic gains that your students have made and the endless best efforts that took place in your learning community. We often start to stress or feel the pressure of the year ending with so much curriculum yet to cover that we neglect the opportunity to recognize the gains accomplished thus far. By instilling in your students (and developing in your teaching practice) the skills to reflect on their effort, accomplishments and next steps we pave the way for students to become a partner with us in the educational journey.

The timing is critical as it will allow all parties involved the opportunity to give and receive feedback that will direct them in their goal setting for the last two months of the year. If this feedback is provided too close to the end of the year there will not be an adequate amount of time to use it to create change. This is an essential time when I focus on the accomplishments of each student and work with them to establish next steps. An analogy that I would use is when a coach takes that final timeout to share a plan and pump up his/her team for that final push to reach their goal. The message the student receives is that I am capable, I have been successful and it is important for me to keep it going rather than coasting into summer vacation. Enjoy this time of year and take great pride in what you have been able to accomplish with your students.