Photo of Mike Beetham

Divide and Succeed

One of the biggest concerns a teacher is faced with is the number of students they have to work with and thus the needs to be met in their classroom. Amongst that class of students will likely be special need students from both an academic and/or behavioural need, students who work very quickly and students who need extra time to consolidate their learning, students working below grade level, at grade level and above grade level. The class profile has a direct impact on the teacher’s plan of action. A successful strategy that has allowed me to ensure that I have direct, 1:1 contact with every student is a divide and succeed.

What I do is to start with a two week cycle (10) school days. I then look at my class number (I will use 30 for a working example) and divide that group into 5 groups. Thus I will end up with 6 students in each group. Each group will be assigned a conference day. Group 1 will get Mondays, Group 2 will get Tuesdays and so on. I then divide those 6 students into 2 groups of 3. Student A, B and C in Monday’s group will meet with me on week 1. Students D, E and F will meet with me on week 2. That means that during each academic day I have to build in time to meet with 3 students. That is a doable strategy. The end result is that I get to meet 1:1 with each student at least once every two weeks. What occurs during that quality time is up to you. I currently use it to conference on reading, writing and personal check-ins.

As I get more efficient in my conferencing and pinpoint exactly what I want to check up on, assess or discuss I am able to move it to a 1 week cycle where I now meet with 6 students a day. At this point I know my students very well and know which students need more conference time and which students need less time. There are many ways to revise this strategy such as when week 1 is used to conference with all students and week 2 is used for necessary follow-ups or teaching students to lead their own conference. There is no interrupting (unless an emergency) during a conference. The class has built in peer supported strategies when the teacher is in a conference. All of the above require routines that need to be taught to the class. This time serves me so effectively when reporting times arrive as I know so much more about my students.

Photo of Mike Beetham

Shifting to Assessment As Learning

How did I do teacher? Did I do it right? Is this what I am supposed to do?  These are the questions that I have heard over and over my entire career. I began to wonder why is it that my students always need to have me tell them how they are doing. As my understanding of good assessment practices evolved, so did my understanding of assessment as learning. This is the ultimate goal of what effective assessment practice strives to create in learners.

Once students not only know what they are doing, but what a successful product looks like (success criteria), they shift from teacher focussed to student directed. At first my practice consisted of the criteria being established by me and then shared with my students. As I continued to enhance my understanding of effective assessment practice (Damian Cooper – Talk About Assessment 2006) I began to experiment with student created criteria. Lo and behold, not only did my students get it, they now owned it and the task became contextually valid to them.

My current pedagogy that I am phasing into my practice is a daily debrief on the day’s learning. I will often use it at our final circle time of the day, journal writing or individual conferencing. The following questions are my guide:

What did you learn today?                 How do you know you learned it?

How well did you learn it?                  What helped you learn it?

What did you find difficult to learn today?                     Why?

What could you do tomorrow to make it easier to learn?

Where can you use what you learned today?

I usually choose two questions and focus on a specific area. What did you learn in mathematics today? I am very happy with the beginning results I am obtaining. I have just recently started to take a few notes from the discussion and remind students the following day so that they can use their own feedback to assist with the new day’s learning.

If you have any other prompts or guiding questions that you use, please post them for other to use.  

Photo of Lisa Taylor

Using Twitter in the Classroom

Sure, Twitter can be used to find out what Kim Kardashian had for lunch today, but it can also be used to connect classrooms, teachers, and school communities.

Today I am going to talk about connecting with your families and students through Twitter.

Twitter is a powerful tool if used properly. The first step is choosing a “handle” (or name) that isn’t already taken. Remember there is a limit of 140 characters in a tweet, so don’t make your name too long! You might also want to make your name somewhat generic and not directly related to the specific class/school you are at, as that may change next year! Go with something that is specific to you – @TaylorsClass @LearningRules @ClassroomFun @EduFun. Choose something that you can take with you to your next class, your next school, your next experience. It takes a lot of work to build followers and to develop a good collection of people to follow, you don’t want to have to start from scratch each year.

If your goal for this twitter account is just to post stuff to the parents and students in the class, it might be wise to make it a “disposable” account and make it specific to that class and year so you can change it up each year. You might wand a more specific handle: @TaylorGr2_2014 @learning2015 @gr2FI14 – again, be creative!

Once you have settled on a handle, you need to get followers. You don’t necessarily need lots of big name followers for this account – your goal is more to connect your classroom community, possibly connect to other classrooms, share what your class is doing with your school, board, and PLCs. You can do all of this by sharing our handle with those who you think would benefit from seeing the information you are sharing.

Before you tweet, double check the guidelines in your school board around posting student work, names, pictures, etc. Don’t post pics or names of students or their signed work without parent consent.

Even without pics of students, you can still share lots of valuable stuff on your twitter feed. You can tweet text explaining what you are doing, questions that parents might want to ask their kids about what they learned today, agenda messages, reminders, etc…..the list goes on!

Twitter can also be used to connect to famous people. We used to write letters to authors, but now we can tweet them! I have had students write stories in the style of Mo Willems and then we tweeted them to Mo (@MoWillems) and Pigeon (@The_Pigeon) for them to see what we had been working on! We sent Canadian Astronaut Chris Hadfield (@Cmdr_Hadfield) tweets from each of our grade 2 students the day he left space, thanking him for everything he did to educate and inform us while he was up there! Twitter really does make the world a lot smaller!

As a teacher, I have tweeted what my class is doing and it always feels great when parents, other teachers, admin, or anyone really, comments on what we are doing! We often share questions we have, the “I wonder” questions that come out of inquiry – Twitter is an excellent resource for expert knowledge.

If you decide to use Twitter in your classroom, make a point of tweeting at least once a day. Even it if is just to say that everyone is having fun today! I like to print pages that have 140 boxes and teach my kids to write “tweets” about their day and then I will type them in at the end of the period, day, etc. We also post those 140 box sheets on the wall on our “twitter feed” so other classes can see what we are up to!

Twitter seems to be sticking around. We might as well embrace it!

Photo of Mike Beetham

But Why? Part 2

Why I have chosen a video? Why I have allowed them to work in groups? Why am I allowing my students to have choice in their learning?  Why have I assigned homework? This is the question I start with for every instructional unit (and in practice, every classroom decision that I make). Why am I doing what I am doing? What is my desired learning outcome? How will it move my student’s learning forward?

My change to using a backward planning model has been one of the most significant improvements to my teaching practice. I now start all of my instructional planning with the following question:

What do I want my students to know, be able to do and value at the end of this instructional unit?

 Of course my answer always starts with the Ontario Curriculum and the overall expectations of that subject area. The next phase on my planning is where I try to visualize what does that learning look like in the life of a 10 year old (or 15 year old or 7 year old etc…). I try to find the context for the learning so that it becomes real for my students. That context increases the level of engagement, which in turn bolsters the intake of learning.

A caution I always have to remind myself of is that I am viewing the learning tasks and content through an adult focussed brain. To be more effective I have to train myself to screen my teaching through the developmental age of my students. When you know why you are teaching something, the actual teaching becomes so much easier.

Reporting Time


It is that time again, or maybe the first time for you – writing reports. It seems to loom over us as the due date for reports approaches. Yet, it isn’t always as insurmountable as it seems. Here are some tips for assessing, organizing, and preparing reports:

  • Create at-a-glance observation pages. These can be created in a grid or a list. Organize students in boxes or lists alphabetically by first name only. Print the observation sheets in a different colour than white, and put about 10 copies on 3 to 4 clipboards. Now they are handy to pick up and record what you notice, hear, see, throughout the day. If you prefer, you can title them to focus your observations, such as Learning Skills or Math skills. When writing reports it is easy to flip through a pile, looking at the same location on each page for anecdotal notes or examples to include in your reports.
  • Self-assessment. Provide time and guidance for student’s to self-assess particular work or their learning skills. It also beneficial to work on goal-setting and reflect on their goals prior to the end of each reporting period. These self-assessments can be useful when writing about their learning skill development.
  • Take photos. Using a smart phone or iPad to take many photos throughout the day can be valuable when writing reports (there are also apps for documenting student work, such as ThreeRing or Sesame). Often, you see students collaborating or participating in photos that you may not have realized during the activity. This happened for me when we had a guest dance instructor in the classroom. I took video and photos throughout the workshop. When I reviewed the video before writing reports I was surprised to see that the students I considered reluctant in dance, were actually dancing!
  • Record marks and brief comments. When I record marks in my assessment binder, I also add a brief comment. For example, after recording the students’ marks for a math test, I add a brief comment such as “doesn’t understand concept (knowledge)” or “needs work on communicating ideas” or “learning to apply…”. Then, when it comes time to write a comment for math in the reports, I have a quick reference that I can use to personalize the comment and the next steps for learning.
  • Maintain student portfolios. Use a crate or plastic bin for files. Make one folder for student and file all tests and work samples. Refer to the file when writing reports to have specific pieces as examples. Then return work to students and start anew for the next assessment period.
  • Build comments. Build subject specific or learning skill comments using brackets or *** to be filled in with comments and examples that are unique to each student. Cutting and pasting the same comment using only modifiers forces students to fit into a high, medium, or low category that may not best represent them.
  • Prepare for interviews. Before parent interviews, review the reports and jot down a few strengths and needs in a notebook (I organize one page per student) to guide your discussion. Then, make notes regarding any comments or concerns the parent offers, as well as any follow-up accommodations or communications you need to do. Then, you have these notes to refer to in any meetings that follow or for your next reporting period.
Finding your own routine of organizing and preparing for report, will help to ease the stress that report writing often brings.


Photo of Lisa Taylor

Behaviour Management – is there one magical system?


How you decide to manage behaviour in your classroom will in the end be up to you. There are many, MANY blogs about the topic, and many are worth reading, if not to get great ideas and resources, but to hear about what not to do! Pinterest is full of links to blog posts, posters, resources, etc., that you can use in your classroom. In the end, it will depend on what you are comfortable with, and the group you have.

When I first started teaching, I tried a marble jar. I made the mistake in my first year of taking marbles out when my kids were misbehaving and this was an awful mistake on my part. I totally lost their trust. If you use a system where you give something, if at all possible, don’t take it back. They have earned that and no future behaviour should impact past positive behaviour.

There is more than just a marble jar out there now! I am going to list a few systems I have used, and some I haven’t. Keep in mind that each of these systems needs to be rejigged to fit your own needs for your teaching style, and the group of kids you are working with.

Class Dojo

Class Dojo is a digital app that is great for tracking behaviours and students and parents can check their progress from home. If you are absent a lot (I was often out on union business, personal illness, and supporting an ill child), it is a great system as you can leave it for

an OT and you can “check in” on your kids and see how they are doing throughout the absence. You get to choose a monster/alien/creature for each student. When I created my class the year I used this app, I chose one colour for my high fliers. I didn’t tell the class this, but it was an easy way for the OT to remember what students needed more positive reminders.

The thing I don’t like about Class Dojo is that it is a token economy where you can give and take points away. Students can actually be in the negative. This is very discouraging for students. It has always been my philosophy that if a child has earned some positive reward of sorts, that they should keep it. If you feel this same way, this app might not be for you, or you would just not use the deduct a point feature.

I have also used this app to track behaviours (secretly – not as a whole class management system). I had a student who was struggling with several severe behaviours – hands on, calling out, personal space, etc. We set him up on Class Dojo and the EA that was in our room would track with positives and negatives as it gave us an excellent print out of his trends. You can change the “behaviours” that it starts with, so you can make them as specific as you need. We even changed one to keep track of ticks in another student.

“Pick Me” Coins

A few years ago I read a blog post about a coins system that I used in my Grade 2 class and absolutely loved! Here is a link to the blog post  – I numbered my students, got some counters (many schools have these in great abundance, but you can get them from most education stores for about $5-10 for enough for the whole class). Each time I saw someone doing something awesome, I would give them a “Pick Me” coin. They would then get to put it into my “Pick Me” bin. I just used a small spaghetti sauce container, or pizza sauce container. Something that will fill up quickly and make a nice sound when you shake it. That way my kids knew I was on the lookout. They put their coin into the draw and then whenever I needed a helper or helpers for anything – attendance, hand things out, collect things, water the plants, run something to the office, etc., etc., etc., the list truly does go on, I just drew a number. This was awesome for two reasons – 1. I never remember to change the “jobs” on the job chart and then the one kid in the class that is on a sucky job like sort the garbage complains relentlessly and you feel awful; and 2. There is never any need to pick anyone for anything and have to think about who has been doing a good job, etc. The system does it for you. My only added rule was that they had to be on task when I drew them. If they weren’t, their number simply went back into the draw for next time. I would empty the “Pick Me” jar at the end of every week.

This is also how I taught my entire probability unit!

I even started letting my kids nominate each other for Pick Mes. I made a form up and they could fill it in and submit it to me. I introduced it during persuasive writing and it was a huge success – and a great way for my kids to start to look for the positive behaviours in others!

This was an amazing system and my class loved it. The second year I did it, my Grade 2s did not buy into it as much and I had to use something else entirely. Every class is different.

Stop Light

My daughter is in Grade 1 right now and she comes home every day saying, “I was on Green all day!” – her class is doing a stop light system. My understanding, from my 5 year old, is that when someone makes a bad choice, they move down to the yellow light, and then down to the red light. “When someone makes to to the red light, Mme calls home!”

Clothes Pin Charts

I have seen variations of the clothes pin names moving around. The thing I am not crazy about with clip charts, is that it really singles out the kids who struggle. Those 
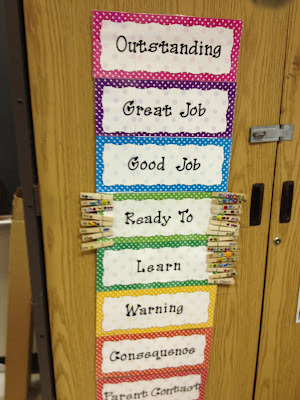
kids who have IEPs and behaviour plans are going to really lose out in this system. It is really easy to get discouraged and give up if you know that every day you are going to end up at the bottom. Set those kids up for success – catch them doing something awesome to move them up as often as you can to start the momentum early. If you can get them moving toward outstanding early in the day, you will be less likely to end up at Parent Contact. If you leave it to them, they will likely end up at the bottom.

NOISE and Decibel Reader

I used this idea for snack time mostly. Put the letters to the word NOISE up on the board. Erase a letter each time the kids need a reminder that it is getting too loud. When it gets to just NO – that means there is NO Talking. It took a few times for them to get to the No Talking part to realize they needed to keep it down. I have paired this with an app that shows the decibels of the room so the lunch helpers don’t have to guess, and have just given them an upper range and when the class goes over that limit, take down a letter. I project the app on the screen so the kids can see where they are as well – add a little science to their snack time!

When it comes down to it, there is no one perfect behaviour management system. Your behaviour management system won’t solve your classroom management problems on its own. It is all in how you use it and manipulate it to serve your purpose. Keep in mind that positive reinforcement is far more effective than negative.

Photo of Lisa Taylor

Communication with Parents – Part 2

Getting the word out to all parents can come in many forms. Some teachers choose to Tweet classroom updates, while others use a texting service like www.remind.com. Whatever you choose to do to contact all of your parents, should be consistent, and you should be sure to only use it when contacting the whole group.

When you need to address an issue/concern with a parent directly, there are a number of ways to go about doing it. Whatever way you decide to use, make sure you document everything. Document every attempted call, every agenda note, every email you send (and don’t forget to CC your admin when you do contact them through email!). Documentation can become very important if a parent comes to the school upset that something caught them off guard, or claims that they were never informed. Having your documentation can protect you. Record dates, times, type of communication, and the reason for the communication. If you get in touch, record the outcome of the interaction as well. If you are doing this digitally, try not to use full names (instead of saying, “Contacted Lisa Taylor to discuss issues with her son Andrew Taylor….” you may want to code it as, “Contacted L. Taylor to discuss issues with her son AT.”). This just adds a level of security. If you are keeping these files in paper format, make sure you store them securely, as you may be recording the details of sensitive conversations.

So how do you actually make contact? There are several ways you can go:

Agenda Message – don’t include details of a concern/incident in the agenda, as they can often get left on the school bus, or read by other students. Just put a message that requests that the parent either contact you to discuss, or give some dates of when they can meet/when they are available to receive your call.

Phone Message – if you call and get the parent, great! Discuss away. If you get a voicemail system, if it clearly states the family name and you are 100% confident you have dialed the correct number and this is that family’s answering machine, you should still consider only identifying yourself and asking if the parent can call you, or send a message in the Agenda of times that would be good to meet/call. Do not leave details of a concern or situation on the voicemail system, as you don’t know who will listen to it, nor do you know if someone else might overhear it. You also do not want your own voice recorded, sharing information about a student, as this could put you in some hot water. Just ask the parent to call back. If the “concern” is to remember to bring a permission slip, or a forgotten library book, these messages can be left on a machine.

Email – if you decide to email a parent, treat it like a digital Agenda, and just request times for a meeting, or phone call. Do not use names in the communication (i.e., “can you let me know when you are available to chat about A’s progress at school?”), on the off chance that you have mistyped the email address. Also, always CC your principal, both to keep them in the loop, and so that there is a 3rd participant in the conversation. This is more about protection for yourself. If a parent is upset about something, they may try to take email comments out of context. If the admin has been included in the conversation all along, they will be able to defend your choices, and support you without any difficulty.

In-Person – this is always the best way to do it. Body language, tone, expression, some or all of these things are lost in the other forms of communication. If at all possible, try to just use the other 3 types to get to an in-person meeting.

Don’t forget, no matter how you communicate, make sure you document everything. Everyone is different in how they keep that information, but the most important thing, is making sure you are keeping track of the communication with as much detail as you can. These notes not only help you to remember what was discussed/decided, but they also may help you if there is a dispute or concern.

Setting Learning Goals

One thing I really try to teach my students is a sense of ownership with regards to their education. All too often, I find students are content to just sit back, be told what to do and where to improve, and never think too hard about their own strengths and needs as learners. It isn’t ever as simple as just asking them what they think they did well and how they could improve next time, though – you have to start small and work up from there. Overall, I’ve found it a really rewarding experience to work with them to create goals, monitor their progress, and reflect on their learning.

I start on the very first day of school, where I ask them (among other things) what some of their goals are for the year ahead. Often my students’ goals are related to learning French, as I teach Middle French Immersion and it’s their first year in the program. I’ll ask them for a bit of detail – so instead of just saying “I want to get better at math,” I ask them what specifically they think they could be doing better in Math. It’s a good starting point to see what they think about themselves as learners. Sometimes it even highlights anxiety right from the start, as I have had students in the past give me a very long paragraph about how “bad” they are at reading, writing, multiplication, etc. It’s also usually very good insight into which students are highly motivated to learn and/or improve their French skills.

In mid-October, after we have gotten a few larger tasks finished and I have had time to see their learning skills and work habits in action, we have a discussion about the six different learning skills on the report card and what those mean for them in practice. I have them complete a self-evaluation using criteria that we develop as a class, giving themselves N, S, G, or E for each learning skill and answering two questions: What do you think you are doing really well? and What do you think you could be doing better? I limit them to only one area to improve, in order to focus their attention; otherwise, some students would put “everything” down for what they could improve.

This first self-evaluation often has students being WAY too hard on themselves. It’s why I always give them my own evaluation of their progress immediately afterwards, so they can see the comparison. Sometimes our opinions line up, sometimes our opinions are wildly different, but it’s an opportunity to have a dialogue with each student individually about what they think of themselves as learners and what I see as their teacher. We discuss both evaluations – mine and theirs – and then decide on a course of action. What will he/she be working towards improving? (Responsibility – managing time effectively and getting work done on or before the deadline.) How will he/she get there? (Break tasks down into steps and check in with the teacher regularly to ensure that he/she is on track.) How will we know that he/she has been successful? (If most work has been handed in on time, it’s probably an improvement!)

I send the student’s self-evaluation and our plan of action home with them when I send the Progress Report in November. It helps students be accountable to their parents about how they are doing in school. If a student is going to give him/herself an S for Collaboration, and I agreed, then the parent knows that it isn’t just me that sees it this way – the student is admitting that they need to work on this area. It allows an opportunity for students to speak with their parents about their strengths and needs, too, and vastly reduces the amount of explaining parents need ME to do come interview time.

By the time first term report cards come up, students have generally had a lot of time to work towards their goals and we can sit down and assess where they are, whether they feel good about their progress or not, etc. We do another self-evaluation following the same format as the first, and I again show them my own evaluation afterwards. We repeat the process: sit down and chat, compare evaluations, decide on a course of action, send both evaluations home with the report card. Sometimes students keep the same goal, if they and I feel that they have more work to do, but others have made good progress by this point and want to tackle another area of need instead.

For the last report card, I still have students do a self-evaluation, but I don’t help them plan the course of action that time. They’re expected to be able to reflect, think critically, and come up with their own plan of attack for how they will work towards their goal over the summer and/or as they enter the next school year. Overall, my students have been very successful with this kind of self-reflection and I have seen a tremendous amount of benefit in having them be accountable for their learning skills and work habits. It sends the message that I feel that the first page of the report card is every bit as important as the academics on the subsequent two pages, and I find that my students take their work habits MUCH more seriously in class knowing that we talk about them so often.

Sometimes I have students who honestly deserve an Excellent in all six skills and don’t have much space for “improvement,” so to speak. For these students, we try to find ways to encourage them to take on more of a leadership role in the classroom so that other students can benefit from their skills and confidence. This, too, has been highly beneficial, especially in a second language classroom. It lets them know that their work isn’t finished when they get their E and that there is always somewhere to go from there.

I would strongly encourage all teachers to talk to their students about that first page of their report card, break the language down to criteria they will understand (because honestly, some of those criteria on the report card are HARD to understand!), and get them to think critically about their strengths and needs as learners.

Photo of Tammy Axt

Creating Criteria With Students

Allowing students to have input on criteria for an assignment helps them gain a clearer picture in their mind of what they need to do in order to be successful at a task. Although creating criteria together for every task would be ideal, time usually plays a large factor in making this difficult, especially for planning time teachers. As a planning time teacher, you often see the students for around 30-40 minutes at a time once or twice a week.

Today I want to show you a very quick way (under five minutes) to create criteria with students.

My grade four classes are currently studying the recorder. They are about three weeks into learning this instrument and are now learning a few songs to present next month. In preparation for the assessment and evaluation for their upcoming songs, I wanted them to help create the criteria. I handed out a sticky note to every student when they entered the class. Their job was to write down one thing that they think a person would need to do to be successful at playing a song on the recorder. After about two minutes, I had some students start to share their ideas with the class and we started to listen for some patterns and began to categorize their ideas. Students had active discussions and came up with eight different criteria that they should be assessed on at this point in their learning. The criteria will change as we learn new pieces of music and gain confidence with our basic skills.

The students will all have a copy of the criteria in their duo tangs and I will give them feedback regularly on this sheet as we are working towards improving our skills.

Taking five minutes to create some assessment categories not only gave them a set of very specific skills required to be successful, but also gave me a lot of information. As you can see from the picture below, the amount of students who wrote “cover the holes”, “blow less”, “finger or play the pitches correctly”, “put the left hand on top” far outweighed tonguing or correct rhythm. I can use this information for planning my upcoming mini lessons.

In addition, over the next couple of weeks, I will also be using two or three minutes per class where one student gets to be the teacher and we will practice assessing each other using the criteria. I will play some pieces on the recorder and have the pretend teacher give me some very specific feedback according to the criteria. In just a few classes, the students’ ability to give feedback to each other will drastically improve and this will create an environment where there are multiple experts in the class and everyone can help each other.

Overheard in my Ontario Classroom…

As my family comes from the province of Prince Edward Island, I grew up participating in kitchen parties. I have been inviting my grade five students to participate in kitchen parties with me including some very rowdy versions of I’se the B’y. To demonstrate a true kitchen party, I have been using spoons, foot stomping, piano, pots and pans and basically anything I can to make the songs lively. I was singing joyfully the other day and instead of singing “I’se the B’y that builds the boat”. I sang “I’se the B’y that kills the boat.” Some of the students paused what they were doing with confused looks on their faces and finally one boy raised his hand and asked “Miss. Gallant, do you have something against this boat?” I had no idea I had even sang those lyrics.
Sometimes students are paying closer attention than you are.

Photo of Samantha Perrin

Feedback in the Shape of a Tree

     Providing effective and timely feedback to students is a constant goal for a teacher, particularly when there seems to be so little time during the day. With a crew of 20+ students, it can be a challenge to find the time to sit down with each student and explain spelling and various goals targeted in writing. Often, we get really good at correcting the same errors over and over again without very much evidence of growth or improvement on the students’ part.
     For my grade 3 students, I like to use a quick and effective feedback tool someone shared with me long ago. It is fast, effective and easy for primary students to recognize and utilize.
     Here’s what I do on written work which has been either hand written or typed on the computer; as I read, I underline or circle common spelling errors or errors in syntax such as forgotten capital letters or periods. When I have finished reading the text, I choose a few spelling mistakes or goals that may be missing and write them, correctly, in a list on a corner of the student’s work. Any more than 2 – 4 items in the list can be overwhelming for a student, so I keep it short. Then, I draw a tree around the words so these corrections represent the area of growth for the student. On the page beside the tree, I make sure to write a response or a positive comment such as; “Good details!” or “great ideas!”, etc. When students write the next time, they can conveniently flip through preceeding pages in their journal to check the words in the trees.

Using this feedback strategy, students have a concrete example of how they can improve the content and syntax of their written work, and each time they write in their journal, they have a mini dictionary of some of the words or tips they can easily refer to. A tree is a simple, friendly image to use to offer student-specific feedback. I have found that this strategy encourages students to proofread their work before they submit it, helps  the ‘unlearning’ of some fossilized errors, and sets small, attainable goals for students to improve their writing.