Photo of Lisa Taylor

Student Self Assessment

Our students need to be reflecting on their own learning and skills to ensure they are understanding. Having a child that is struggling with a concept and knows it is much better than having a child who is out to lunch and believes they are on the right track. We need to teach our children to reflect on their learning regularly and ask questions about their learning. Do I understand this? Could I do this on my own? How is this different? How is it the same?

Self Assessment isn’t the only assessment, we aren’t setting ourselves up to not need to assess our students by any means. But we do need to teach our students how to accurately self assess. There should be no surprises for them. If they don’t understand something, they should know that. It is essential that they are able to self assess so they can seek assistance when needed.

Some tools that I have used in my class that I have found to be extremely successful:

Post-it chart – Give each student a post-it and have them answer a question on a topic and put a smile, straight face or sad face on the back and put their answer on their number square of the chart when they leave (for lunch, gym, etc.). Kind of an exit slip, but with some self reflection. The happy, straight, sad face corresponds to how they feel about their answer – did they get it, kind of, not at all.

Stop Lights – I love this one! Give them a question or activity and have them work through it, and when they hand it in, they put it in the green, yellow, or red bin. They hand their work into the red bin if they feel like they aren’t really getting it, yellow if they are kind of getting it, and green if they think they have it. You can also do stop lights as a post-it activity. I used to keep a laminated stop light on my wall for post-its to be handed in. They just numbered their submission on the back so no one knew where they were putting it.

Self Assessment Form – In Math, I have a standard assessment form for problem solving that I staple to each problem. It has the rubric I use and space for comments, etc. This year I modified it to include a self assessment portion and now the student staples it to their work and fills in the self assessment portion before they submit their problem to me. This way, I have their problem, and their self assessment together and I can refer to them both in my assessment which is all on the same little sheet.

Make sure you do something with student self assessments. It is just as important that you check to see that they are accurate and talk to them about it. It is tricky to tell a child that they aren’t getting it when they think they are, and that is one of the very difficult parts of this job, but it is necessary. Students need to know what they can do and where their needs are so they can seek help and work to become more successful.

Work self assessment into everyday if you can. Even if it is small, like in a game, it is necessary.

Photo of Lisa Taylor

Record Keeping

I am the worst for keeping records!! I always have been. There are so many templates online for keeping documentation of student work, parent contact, meetings, etc. – there are so many things to keep records of!! When you first start out, it will take some time to figure things out, but eventually, you will find things that you like, and you will personalize them as you go, and your “system” will evolve over the years until you have your own method.

Some things to consider when developing your own system:

1. Try to be consistent. At the very least, if you are consistent, you will be able to compare notes, you will be able to file things in a regular manner, and you will be able to rely on your notes from  months ago as being accurate if you are using a consistent format.

2. Put things where they belong immediately. There is nothing worse than finding student assessment notes on a post-it stuck to something months after you are done a unit and realizing that you had to re-assess that student because you thought you didn’t know what was on that post-it! File things immediately. If you are using post-its to keep track of student work, keep a file folder for each student on your desk and quickly put their post-its in the file at the end of each day to make sure you have them all. Then pick one planning time period a week to be your post-it planning and make sure you go through them and log them somehow.

3. Back up. If you are going digital, which many people are, back it up! Use a cloud storage system and just don’t use full names. I number my class so I just need to have numbered files. Evernote is great for storing student work and is user-friendly as a computer app and on an iPad or other device. You can snap pictures and videos of student work and tag other students if it was group work so it can be shared in multiple folders. This also saves your work in the cloud so it is accessible from anywhere! No lugging bins of student work home to work on report cards!!

4. Date everything!!! Make sure you put a date on things. I finally picked up a date stamp and it was the best $7 I ever charged to my school account! You don’t want to pull out a note that says you spoke with Julie’s mom about her math and refer to it if it was 5 months ago. Make sure know when things took place.

5. Make it as easy as possible on yourself. If you are going to go paper-pencil, make up some forms that have some of your key information already there, so you can easily fill things in when you need to. Colour-coding those pages might help too (i.e., blue for student records, pink for parent contact, etc.).

Whatever you decide to do, make sure you are as organized as possible. My records are getting better, but I still don’t have one perfect system. Your system will evolve. You will probably never find a blog post with someone’s record keeping system laid out and adopt it 100% without any modifications. It is a great idea to read up on other systems though to get ideas, even print off some forms, etc. to have on hand in case you need them. Record keeping is an overwhelming, but essential part of teaching, so it is so important that you take your time and do it properly. It could save you in the event of an allegation, or other situation.

Photo of Lisa Taylor

Using Twitter in the Classroom

Sure, Twitter can be used to find out what Kim Kardashian had for lunch today, but it can also be used to connect classrooms, teachers, and school communities.

Today I am going to talk about connecting with your families and students through Twitter.

Twitter is a powerful tool if used properly. The first step is choosing a “handle” (or name) that isn’t already taken. Remember there is a limit of 140 characters in a tweet, so don’t make your name too long! You might also want to make your name somewhat generic and not directly related to the specific class/school you are at, as that may change next year! Go with something that is specific to you – @TaylorsClass @LearningRules @ClassroomFun @EduFun. Choose something that you can take with you to your next class, your next school, your next experience. It takes a lot of work to build followers and to develop a good collection of people to follow, you don’t want to have to start from scratch each year.

If your goal for this twitter account is just to post stuff to the parents and students in the class, it might be wise to make it a “disposable” account and make it specific to that class and year so you can change it up each year. You might wand a more specific handle: @TaylorGr2_2014 @learning2015 @gr2FI14 – again, be creative!

Once you have settled on a handle, you need to get followers. You don’t necessarily need lots of big name followers for this account – your goal is more to connect your classroom community, possibly connect to other classrooms, share what your class is doing with your school, board, and PLCs. You can do all of this by sharing our handle with those who you think would benefit from seeing the information you are sharing.

Before you tweet, double check the guidelines in your school board around posting student work, names, pictures, etc. Don’t post pics or names of students or their signed work without parent consent.

Even without pics of students, you can still share lots of valuable stuff on your twitter feed. You can tweet text explaining what you are doing, questions that parents might want to ask their kids about what they learned today, agenda messages, reminders, etc…..the list goes on!

Twitter can also be used to connect to famous people. We used to write letters to authors, but now we can tweet them! I have had students write stories in the style of Mo Willems and then we tweeted them to Mo (@MoWillems) and Pigeon (@The_Pigeon) for them to see what we had been working on! We sent Canadian Astronaut Chris Hadfield (@Cmdr_Hadfield) tweets from each of our grade 2 students the day he left space, thanking him for everything he did to educate and inform us while he was up there! Twitter really does make the world a lot smaller!

As a teacher, I have tweeted what my class is doing and it always feels great when parents, other teachers, admin, or anyone really, comments on what we are doing! We often share questions we have, the “I wonder” questions that come out of inquiry – Twitter is an excellent resource for expert knowledge.

If you decide to use Twitter in your classroom, make a point of tweeting at least once a day. Even it if is just to say that everyone is having fun today! I like to print pages that have 140 boxes and teach my kids to write “tweets” about their day and then I will type them in at the end of the period, day, etc. We also post those 140 box sheets on the wall on our “twitter feed” so other classes can see what we are up to!

Twitter seems to be sticking around. We might as well embrace it!

Photo of Lisa Taylor

Behaviour Management – is there one magical system?


How you decide to manage behaviour in your classroom will in the end be up to you. There are many, MANY blogs about the topic, and many are worth reading, if not to get great ideas and resources, but to hear about what not to do! Pinterest is full of links to blog posts, posters, resources, etc., that you can use in your classroom. In the end, it will depend on what you are comfortable with, and the group you have.

When I first started teaching, I tried a marble jar. I made the mistake in my first year of taking marbles out when my kids were misbehaving and this was an awful mistake on my part. I totally lost their trust. If you use a system where you give something, if at all possible, don’t take it back. They have earned that and no future behaviour should impact past positive behaviour.

There is more than just a marble jar out there now! I am going to list a few systems I have used, and some I haven’t. Keep in mind that each of these systems needs to be rejigged to fit your own needs for your teaching style, and the group of kids you are working with.

Class Dojo

Class Dojo is a digital app that is great for tracking behaviours and students and parents can check their progress from home. If you are absent a lot (I was often out on union business, personal illness, and supporting an ill child), it is a great system as you can leave it for

an OT and you can “check in” on your kids and see how they are doing throughout the absence. You get to choose a monster/alien/creature for each student. When I created my class the year I used this app, I chose one colour for my high fliers. I didn’t tell the class this, but it was an easy way for the OT to remember what students needed more positive reminders.

The thing I don’t like about Class Dojo is that it is a token economy where you can give and take points away. Students can actually be in the negative. This is very discouraging for students. It has always been my philosophy that if a child has earned some positive reward of sorts, that they should keep it. If you feel this same way, this app might not be for you, or you would just not use the deduct a point feature.

I have also used this app to track behaviours (secretly – not as a whole class management system). I had a student who was struggling with several severe behaviours – hands on, calling out, personal space, etc. We set him up on Class Dojo and the EA that was in our room would track with positives and negatives as it gave us an excellent print out of his trends. You can change the “behaviours” that it starts with, so you can make them as specific as you need. We even changed one to keep track of ticks in another student.

“Pick Me” Coins

A few years ago I read a blog post about a coins system that I used in my Grade 2 class and absolutely loved! Here is a link to the blog post  – I numbered my students, got some counters (many schools have these in great abundance, but you can get them from most education stores for about $5-10 for enough for the whole class). Each time I saw someone doing something awesome, I would give them a “Pick Me” coin. They would then get to put it into my “Pick Me” bin. I just used a small spaghetti sauce container, or pizza sauce container. Something that will fill up quickly and make a nice sound when you shake it. That way my kids knew I was on the lookout. They put their coin into the draw and then whenever I needed a helper or helpers for anything – attendance, hand things out, collect things, water the plants, run something to the office, etc., etc., etc., the list truly does go on, I just drew a number. This was awesome for two reasons – 1. I never remember to change the “jobs” on the job chart and then the one kid in the class that is on a sucky job like sort the garbage complains relentlessly and you feel awful; and 2. There is never any need to pick anyone for anything and have to think about who has been doing a good job, etc. The system does it for you. My only added rule was that they had to be on task when I drew them. If they weren’t, their number simply went back into the draw for next time. I would empty the “Pick Me” jar at the end of every week.

This is also how I taught my entire probability unit!

I even started letting my kids nominate each other for Pick Mes. I made a form up and they could fill it in and submit it to me. I introduced it during persuasive writing and it was a huge success – and a great way for my kids to start to look for the positive behaviours in others!

This was an amazing system and my class loved it. The second year I did it, my Grade 2s did not buy into it as much and I had to use something else entirely. Every class is different.

Stop Light

My daughter is in Grade 1 right now and she comes home every day saying, “I was on Green all day!” – her class is doing a stop light system. My understanding, from my 5 year old, is that when someone makes a bad choice, they move down to the yellow light, and then down to the red light. “When someone makes to to the red light, Mme calls home!”

Clothes Pin Charts

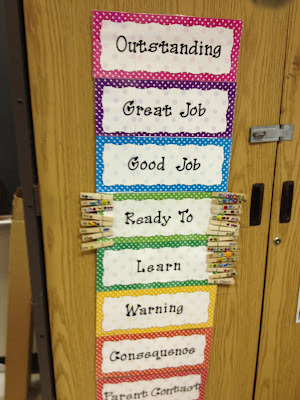
I have seen variations of the clothes pin names moving around. The thing I am not crazy about with clip charts, is that it really singles out the kids who struggle. Those kids who have IEPs and behaviour plans are going to really lose out in this system. It is really easy to get discouraged and give up if you know that every day you are going to end up at the bottom. Set those kids up for success – catch them doing something awesome to move them up as often as you can to start the momentum early. If you can get them moving toward outstanding early in the day, you will be less likely to end up at Parent Contact. If you leave it to them, they will likely end up at the bottom.
NOISE and Decibel Reader

I used this idea for snack time mostly. Put the letters to the word NOISE up on the board. Erase a letter each time the kids need a reminder that it is getting too loud. When it gets to just NO – that means there is NO Talking. It took a few times for them to get to the No Talking part to realize they needed to keep it down. I have paired this with an app that shows the decibels of the room so the lunch helpers don’t have to guess, and have just given them an upper range and when the class goes over that limit, take down a letter. I project the app on the screen so the kids can see where they are as well – add a little science to their snack time!

When it comes down to it, there is no one perfect behaviour management system. Your behaviour management system won’t solve your classroom management problems on its own. It is all in how you use it and manipulate it to serve your purpose. Keep in mind that positive reinforcement is far more effective than negative.

Photo of Lisa Taylor

Communication with Parents – Part 2

Getting the word out to all parents can come in many forms. Some teachers choose to Tweet classroom updates, while others use a texting service like www.remind.com. Whatever you choose to do to contact all of your parents, should be consistent, and you should be sure to only use it when contacting the whole group.

When you need to address an issue/concern with a parent directly, there are a number of ways to go about doing it. Whatever way you decide to use, make sure you document everything. Document every attempted call, every agenda note, every email you send (and don’t forget to CC your admin when you do contact them through email!). Documentation can become very important if a parent comes to the school upset that something caught them off guard, or claims that they were never informed. Having your documentation can protect you. Record dates, times, type of communication, and the reason for the communication. If you get in touch, record the outcome of the interaction as well. If you are doing this digitally, try not to use full names (instead of saying, “Contacted Lisa Taylor to discuss issues with her son Andrew Taylor….” you may want to code it as, “Contacted L. Taylor to discuss issues with her son AT.”). This just adds a level of security. If you are keeping these files in paper format, make sure you store them securely, as you may be recording the details of sensitive conversations.

So how do you actually make contact? There are several ways you can go:

Agenda Message – don’t include details of a concern/incident in the agenda, as they can often get left on the school bus, or read by other students. Just put a message that requests that the parent either contact you to discuss, or give some dates of when they can meet/when they are available to receive your call.

Phone Message – if you call and get the parent, great! Discuss away. If you get a voicemail system, if it clearly states the family name and you are 100% confident you have dialed the correct number and this is that family’s answering machine, you should still consider only identifying yourself and asking if the parent can call you, or send a message in the Agenda of times that would be good to meet/call. Do not leave details of a concern or situation on the voicemail system, as you don’t know who will listen to it, nor do you know if someone else might overhear it. You also do not want your own voice recorded, sharing information about a student, as this could put you in some hot water. Just ask the parent to call back. If the “concern” is to remember to bring a permission slip, or a forgotten library book, these messages can be left on a machine.

Email – if you decide to email a parent, treat it like a digital Agenda, and just request times for a meeting, or phone call. Do not use names in the communication (i.e., “can you let me know when you are available to chat about A’s progress at school?”), on the off chance that you have mistyped the email address. Also, always CC your principal, both to keep them in the loop, and so that there is a 3rd participant in the conversation. This is more about protection for yourself. If a parent is upset about something, they may try to take email comments out of context. If the admin has been included in the conversation all along, they will be able to defend your choices, and support you without any difficulty.

In-Person – this is always the best way to do it. Body language, tone, expression, some or all of these things are lost in the other forms of communication. If at all possible, try to just use the other 3 types to get to an in-person meeting.

Don’t forget, no matter how you communicate, make sure you document everything. Everyone is different in how they keep that information, but the most important thing, is making sure you are keeping track of the communication with as much detail as you can. These notes not only help you to remember what was discussed/decided, but they also may help you if there is a dispute or concern.

Photo of Lisa Taylor

Communication with Parents – Part 1

Communication with parents/guardians is not just a courtesy, it is a legal requirement as part of being a teacher. How you communicate with parents/guardians depends a lot on the content of the message.

Sometimes information is for all parents. This can go out in a newsletter format. Be careful about setting up unreasonable expectations of yourself around how often your newsletters come out. If you start the year sending them every Monday, parents will start to depend on seeing them on Mondays and you will preset that expectation that they will continue to come weekly, even on weeks when there isn’t a lot to share. Don’t make work for yourself, try to make your newsletters (should you choose to send them home) more sporadic so you don’t set yourself up with these expectations that you are sometimes unable to maintain.

If you choose to go digital, make sure you provide a non-digital option for families who do not have access. If you have families who do not speak English at home, you may want to speak with your admin about resources available to you in your board for translating some of the essential information to ensure all families are getting information equitably.

Deciding on a digital format can be challenging. Many teachers choose to set up a classroom website or blog, which allows them to post information. Be careful about allowing 2-way communication happen on the page without moderation. The last thing you want is your page to become a place for parents to start complaining or chatting about unrelated items. In my experience, using the Blog format (Blogger through Google was the format I used) is a great way to share resources and activities. There is a moderate option in setting so students and parents can comment but they come to you first and you can decide if they get posted. Sometimes a comment might not need to be posted (i.e., “can you please call me tomorrow to discuss the report card?”), whereas, others add to the value of the resources and information shared.

This link (http://taylor2s.blogspot.ca/2014/03/it-is-certain-you-will-love-these-games.html) is to my classroom blog that I used last year. I shared the link on every paper newsletter I sent home, tweeted it, wrote it in agendas, had the students start there at the beginning of each session on the computers in the class – we used it all the time! My class was used to the site and they would go home and share it with their family. I could then use it share information with the families. (I went on leave at the end of the year and was even able to invite my LTO onto the site as a guest blogger to post while I was away!).

If you choose to email your newsletter, send it as a PDF and CC your principal. This adds an extra level of transparency. Be advised however, that when it is sent as an email, it is easy for a parent to hit reply and ask a question, make a comment, etc (i.e., should we send extra mittens that day just in case? – something that they can figure out on their own, or put in the agenda if it is really a burning question). Make sure you send it during normal school hours (8-5 is a good general rule of thumb) and be careful not to engage in casual conversation over email. You need to maintain professional boundaries when dealing with parents at all times. With email, it is easy to get casual.

Communication is an essential part of teaching. When you are communicating with all of the parents in your class, you can be more general in your approach. Next week, I will look at more specific communication tools for when you want to contact individual parents.

Photo of Lisa Taylor

Long Range Plans – Are they ever really done?

Some teachers dive right in over the summer and plan their whole year out! I have never been that kind of teacher. Not only do I not have the patience, I am simply not organized enough to get everything laid out in advance. I find it especially difficult to get long range plans together before I have met my students.

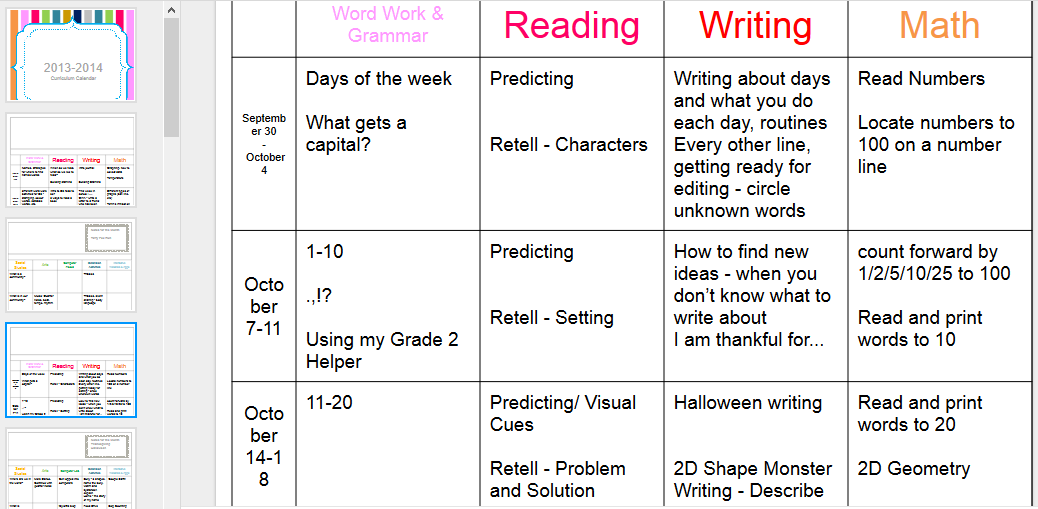
I have tried doing a spreadsheet with a few words in each box to outline what will be happening and have each cell represent a 1 or 2 week block (pictured above), I have tried doing all of the different strands on their own page with the whole year laid out, I have even printed the curriculum document for each strand I teach and cut each expectation out and then paired them with similar expectations (i.e., in Grade 2 Science the students look at the changes of states between solids, liquids and gases, this could be paired with measuring temperature in the Math Measurement Strand, and even volume). Then I tape them all down in groups and go from there.

Last year I went with a template that gives a full 2 page spread with a row of cells for each week. At the beginning of the year, I planned out general ideas for each month/week (i.e., I would focus on data management – graphing for the first 2 weeks, picking a just right book, and writing a retell to be connected to the Social Studies curriculum of Celebrations). Each page started out very general. As the year went on, I could use each page as more of a detailed planning spot where I would go in and “beef up” the plans for that week. Adding in the specifics of what I was going to be doing. I found this was excellent, as it acted as a long range plan and my general daybook. In many cases I would even write in the strands that we had accomplished as we finished them up for my own records.

Handing in my long range plans was difficult, as they were very thin to start. I sat down with my principal and walked him through my plan. I had taught Grade 2 before so I was pretty familiar with where the curriculum would fit together, and I had worked with my grade partner to pair up on some things and make sure we were not overlapping on others (i.e., we didn’t want to both be working on certain strands at the same time as we shared resources, but others we would want to do at the same time to bring our classes together, etc.). My plans were not overly detailed, but they had genera ideas for when I would be working on different strands, etc.. I explained to him that they are not really, “done” yet. He demanded that I finish them and submit them. It took some explaining, but in the end, I was able to create my plans the way I wanted and share them digitally through Google Drive. This way, he could pop in at any time and see where my class was headed and it was always up to date.

Not only did this format work exceptionally well for me, my principal was quite pleased in the end because my plans were the only accurate ones he had by May! We change where we are going with our teaching all the time, it is just what happens in a classroom! You get an email from a local theater company that they are putting on a show in January that would fit perfectly with something you were going to teach in May: you change your plans to accommodate. You find out that they materials you needed for your awesome unit are booked up for the month you were planning to teach it: you change your plans to accommodate. Long Range Plans are as much a living document as any other document we work with! Let it be organic and know that there will be times where you planned to work on something for 2 weeks and at the end of 2 weeks, they still don’t get it! Accommodate and move forward!

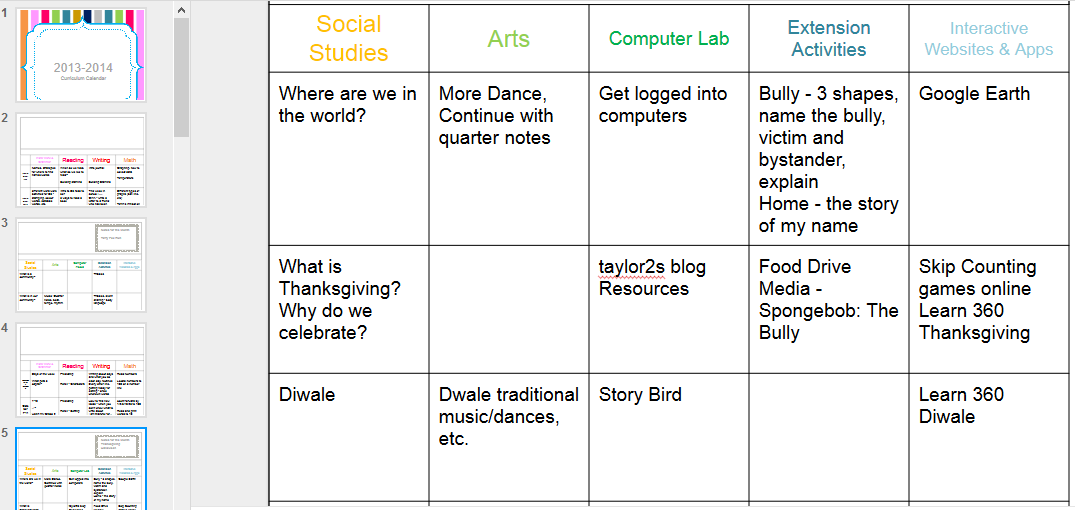
Below are some pictures of the plans I submitted last year to my principal as they looked at the end of the year – they were changed A LOT between September and the end of the year! If a box was left empty, it was because I would be continuing what we had started the week before.

At the beginning of the year, the page for these weeks might have said: Days, punctuation, predicting/retell, writing routines, read numbers and locate on number line, and 2D geometry. When I got to that week, I beefed those weeks up a bit, elaborating on what I was going to do each specific week to build on the concepts, etc.

Photo of Lisa Taylor

Themes of Success: Passion for Teaching

When I sat down to think about my very first post for this blog, it was suggested to me that I share some information about myself. So that is where I started. I would share that I have taught for 8 years in the Upper Grand DSB (Guelph and area), that I am currently released from the classroom as Chief Negotiator and Staff Officer at my Local ETFO Office, and that I am a crafter, musician, mother, wife, and animal lover. So many ideas came flooding through!

In reading through the first chapter of Heart and Art, I came across the Themes of Success: themes that emerged after over 2,500 teachers were asked to share their best teaching experience from that year. The heading Passion for Teaching (Page 8 ) really spoke to me.

Passion for Teaching highlights the importance of connecting your own personal experiences and passions with your teaching by drawing on your own personal “resources” for support. I decided this would be the perfect place to start, as I could share some ways that I have done this with my classes with great success, and in the process, you will get to know me a bit better!

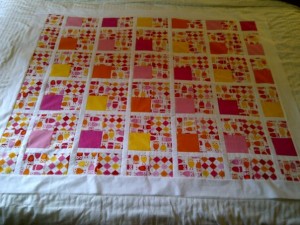
Patterning with Quilts: As an avid quilter, I brought in fabric squares to my Grade 2 class and had students help me plan a quilt. They loved this activity because it was “real” to them. They got to lay out the squares, plan the repeating pattern of colours (in this case light pink, dark pink, yellow, orange) and then see it come together. I would take the squares home and sew a row or two and then come back and have them recall what came next. I would then sew a few vertical columns and see if they could figure out what the next column would look like as the pattern changes in that direction, but there is still a pattern. We did a problem solving based activity with this quilt for weeks!

When I worked with older grades, I brought in fabric measurements (i.e., 100cm x 75cm in blue, 125cm x 50cm in green, etc.) and had them plan out the entire quilt top from start to finish and then the class voted on their favourite quilt and that is the one I cut and made. It is amazing how many ways using quilts in math can be differentiated too! Giving some students a quilt plan and asking them to use colour tiles to plan the pattern, while others are being asked to measure the fabric that would be needed to make that same quilt, allows for extensions galore!


Animal Creative Writing: Living out in the country, we have lots of animals running around our property. One of my favourites is our chickens. We have 8 chickens that wonder the yard and every now and then, one of them disappears for a while. I often give my class an update on what the birds are up to and they write about them. They love using pictures of the chickens, that I take on the classroom iPad, to illustrate their stories using different apps.

I find bringing my own interests into the classroom really helps my students to connect with the activities we are working on and it makes them feel like what they are doing is relevant.