Photo of Tina Ginglo

Timely Effective Feedback with Comic Building Website

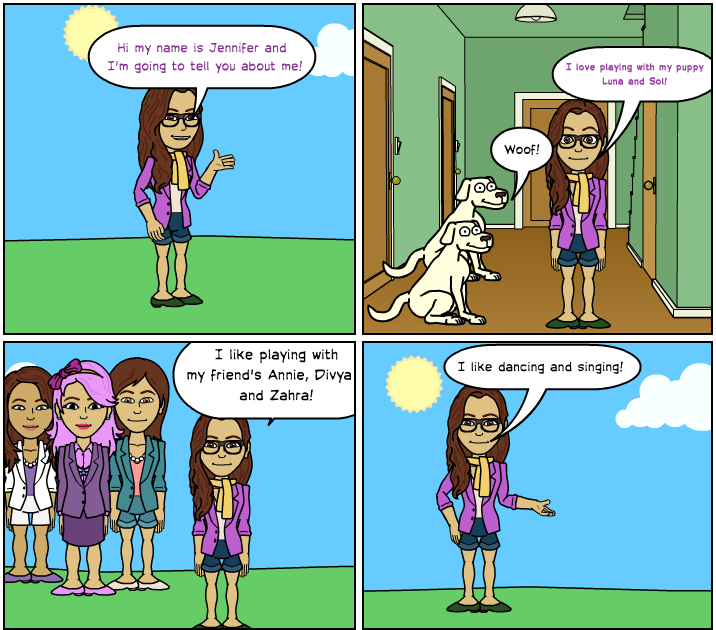
I recently created an account on Bitstrips for Schools.  Bitstrips is a free website where students can create comics or other graphic texts.  Creating an account is easy.  Bitstrips provides you with an access code that you share with your students.  Students simply log in with the access code and they immediately have access to the different activities you create.   Their first task (and yours) is to create an avatar.  Students can then begin to work on the activities you create.

My Avatar

My initial activity was an introductory activity where students were asked to create a comic introducing themselves to the class.  The learning goal for this activity was for students to become familiar with the comic building tools.   After a week of in class work, Bitstrips is now an activity students have an option to go to when other work has been completed or they can work on activities from their home computers. Now, most of my students are completing the graphic text activities at home for ‘homework’.   Parents appreciate that their children are using the Internet to complete school activities rather than to play games and watch videos on YouTube.

A quick and simple activity to help students become familiar with the tools.


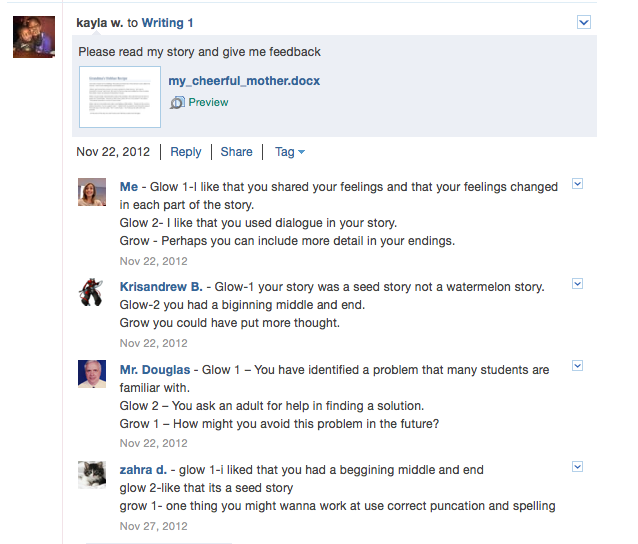
What I appreciate most about this website is that all students, regardless of abilities, can navigate the tools and create a piece of writing. Once students complete an activity, it must be submitted to me for review before it can be published.  I can access student writing from anywhere; smart phone, tablet, at home, or school and I can give them timely specific feedback on their written submission.   I am using Bitstrips to reinforce punctuation and spelling with my third grade students.  I spend a few minutes each evening sending students feedback on their submissions.   The next time students log in to Bitstrips they will see my feedback and they can immediately edit and/or revise their work and resend it to me for another review.


Below are some sample comments I have submitted to students:

Hi Charlie, 

This is a fun comic! Please make sure you begin each sentence with a capital and end with a period.

Hi Krisandrew,

I really like how you ended your comic! I am impressed with all your slides. Please review for punctuation. For example, sentences must begin with a capital. Example “Me too.” You missed a period in one of your thought bubbles. It is movies not movie. Otherwise, great effort! Please correct and resubmit.

Below are two activities I have assigned on Bitstrips.com:

 Turning Narratives Into Graphic Texts

You are to select one of your personal narratives and create a Bitstrip.

You are to use speech bubbles for your dialogue sentences.
You are to use thought bubbles for your thinking and feeling sentences.
You are to use captions for your action sentences.

Your bitstrip should meet the success criteria for personal narratives!

Silly Story Comic

 You are to write a silly story!

You are to use the success criteria for a personal narrative. That is,
-Action, dialogue and thought sentences;
-Beginning, Middle and End;
-Correct punctuation and spelling;

But your story must also include the characteristics of a silly story:

-Strange and impossible events take place;
– Characters act as if everything is normal;
-You leave the reader with a smile on their face.

Your story should be a at least 5 frames long.
Dialogue sentences must be in speech bubbles.
Thinking/Feeling sentences are in thought bubbles.
Action sentences must be in captions a the top or bottom of the frame.

I am fortunate to have unlimited access to computers throughout the school day, but you can do this in a one computer classroom.  As I mentioned in a prior blog post, it is important to know what access your students have to the Internet from home before you encourage Bitstrips as a homework activity.  Bitstrips has helped me engage students in the writing process.  It forces them pay attention to writing conventions and it provides me with a manageable way to provide timely feedback to students.


Photo of Tina Ginglo

Differentiating the Learning Environment

Differentiated instruction can be challenging for a teacher, new or ‘not so’ new.  There are so many ways we can differentiate our instruction that it can be overwhelming trying to get the “differentiated” ball (or should I say cube?:)) rolling.  Where do we start?    I suggest that if you are just beginning to explore ways to differentiate your program that you take it one step at a time.  For me, I feel that the self directed and open-ended nature of my writing program helps me to differentiate student learning in many ways.  Guided reading is another example of how we differentiate content to meet the different interests and readiness of our students.  What I need to explore further are ways I can differentiate the learning environment.  This has been one of my professional learning goals for this year.

I believe that all students need experiences to work independently and collaboratively regardless of their learning preference.  However, in order for students to be successful, we must provide for their learning needs by giving them the structure and opportunity to demonstrate their knowledge and skills in ways that best suit them.

Over the winter break I purchased a dozen privacy panels for my third grade classroom.  They were not too expensive… about twenty dollars. When we returned from the holidays I introduced the panels to the students.  Everyone liked the idea of the panels and wanted to use them ALL the time.  At first, it was a distraction.  My students sit in groups of 4 and every student in a group wanted to use a panel.  I had to explain on more than one occasion that if one or two used a panel in each group then the other students in the group wouldn’t need the panels.  There were times when I had to say, “No panels! Get to work!”

By the time we returned from March Break the novelty of the panels finally wore off.   Now, whenever the need arises, some students will get up from their groups to get a privacy panel and it doesn’t start a “stampede” for the remaining panels!  Students go on with there work indifferent to the colourful cardboard that pops up at different groups throughout the classroom.  I am glad that I didn’t give up on the panels.   I had patience, well… most of the time, and trusted my intuition and the process.  Whenever we introduce something new to the classroom there is usually some excitement and then it just becomes part of the routine.

I have managed to find another way to address the different learning needs in the class.  It is interesting to observe which students decide to use the panels and when.  Jamie, for example, tends to set up a privacy panel when she is writing a reading response in her journal.  Jennifer, on the other hand, needs the panel when we are working on problem solving in math.

It is important for me to create a learning environment where students have as much choice and control of their learning as they can handle at such a young age.  When students are working on an independent activity, I encourage students to support each other in their groups.  As long as they are using small voices and staying on task, I encourage the collaboration.  However, not all students can learn this way.  Some students need to limit the distractions in the environment in order to learn.   These students may choose to work at a desk away from their group, on the carpet or simply put up a privacy panel.   The goal is to teach students to independently decide what learning environment they need in order to be successful in the classroom.    Privacy panels are one way we can offer students choice and control of their learning environment.

Photo of Tina Ginglo

Building Community with a Student of the Week

When I was teaching pre-service and visiting teacher candidates at their practicums, I had many opportunities to see the different ways teachers create community in their classrooms.  One fourth-grade classroom teacher (I am sorry, I don’t remember the classroom teacher’s name) assigned a table in her room for a student to set up a display about his or herself.  This display immediately caught my attention because the student, whose turn it was to share, had brought in a variety of Montreal Canadian artifacts. Since I am a Habitant fan, I immediately wanted to meet this student and talk with him about the artifacts he brought to school.  The student was so pleased to talk to me about how he and his family came to be Hab fans.   The other students in the class were quick to fill in pieces of information the student didn’t share.  This told told me that his classmates practiced attentive listening and mutual respect when the artifacts were presented. I left that classroom knowing that when I returned to teaching elementary students I would do something similar.

Well, I finally introduced the idea of a “Student of the Week” when we returned to school in January.  I asked my student teacher to launch the project by sharing personal artifacts before we broke for the holidays so that when we returned, the first student would be ready to go.

Basically, each week a student prepares an oral presentation and display about them self to share with the class.  I tell the students that by sharing this information we learn more about each other and we will have a greater appreciation of how each member of our class is unique and special.  

Below you will find the learning goal and success criteria for this activity.

 Learning Goal: 

As Student of the Week, I will learn how to:

  • Organize my ideas and present information in a logical sequence;
  • Communicate in a clear way using good volume, speed and eye contact.

Success Criteria:

I know I successfully presented myself as the Student of the Week if:

  • I included information about my past, present and future;
  • I used visuals such as photographs, magazine or Internet pictures;
  • I included objects such as favourite toys, lucky charms or other artifacts;
  • I looked at the audience when I presented;
  • I spoke in a loud and clear voice.

My students LOVE our Student of the Week presentations.  Each week, after a student has done their formal presentation, the presenter pulls a new name from our Name Jar.  The name drawn will have one week to prepare their presentation and display.  I can’t believe how excited the students get when someone’s name is read from the jar.  You would think they one an iPad or somethingJ

I am so pleased with the quality of the presentations each student prepares, but I am equally pleased with the quality of the feedback the students receive from their peers.  Not only do they ask thoughtful and caring questions to find out more about the individual, they also point out which success criteria the student has included and which success criteria they can build upon.  What is really cool is that I didn’t ask the students to provide the feedback, they did it automatically, which tells me that peer feedback is part of the culture of our classroom (I guess I did something right!).

After the presentation and Q and A time I ask some reflection questions such as:

  • What did we learn about <student’s name> that we didn’t know before?
  • What are some of the things you have in common with <student’s name>?
  • How does this activity help our classroom community?

I am sorry I didn’t start this activity at the beginning of the year.  With a never ending list of things to do, I kept skipping over this activity. In hindsight, it didn’t take long to set up.  I basically purchased a display board and stick on letters.  I narrowed down our learning goal and success criteria and put it on a handout for students to take home.   Now Student of the Week is in the students’ hands!  So far, I haven’t had a student forget they were the next Student of the Week.  Each week the Student of the Week has come ready to set up their display and prepared to give their oral presentation to our class.  I think this activity is a keeper!


Photo of Tina Ginglo

Using Audio for Self-Assessment

I have added a new layer to the writing process in my third-grade writing workshop.  As I wrote in a past post, our writing workshop process begins with students writing in their Writer’s Notebooks.  When a writer completes a piece of writing, they then meet with their assigned writing partner and/or me for a writing conference.  At this conference, writers review the success criteria for their writing assignment and then identify two ways in which they have successfully met the criteria.  Writers then identify one criterion that needs to be developed further. They then transfer their writing to their laptop keeping in mind the feedback they received and making their revisions as they type their second draft.  Ultimately, writers post their narratives in their writing group on Edmodo.com where they receive more feedback from their group members.

Using Audacity software and a set of headphones with microphone, my third graders have learned how to read and record their personal narratives.  Once recorded, students listen back.  They then ask themselves two questions:  “In what ways does my story sound like a real story?”  And “In what ways can I make my story sound more like a real story?”  Students enthusiastically record their stories.  This component of the writing process engages those auditory learners who could benefit from this new component of the writing process.

I have changed the way I phrase these reflection questions.  At first I instructed students to ask themselves, “Does my story sound like a real story? Yes or no?”  If yes, why does it sound like a real story? If no, why not?”  I found that this self-assessment exercise wasn’t making a significant difference in their writing.   I concluded that it wasn’t the process that was ineffective, but the questions I was asking writers to consider.   These yes/no questions left writers basically rating their narratives as “good” or “bad.”  Their narratives either sounded “real” or didn’t.  These questions didn’t allow students to identify the strengths in their narratives and where it could sound better.  Realistically, all of my writers’ stories sounded a tad real, some more so than others. The goal here is to make everyone’s writing sound better. Using these new questions should ultimately improve the writers’ craft.

I am also thinking of adding audio to the writing conferences with writing partners and teacher.  Some students struggle to give feedback on other students’ writing for a number of reasons.  Perhaps a student’s penmanship is difficult to read or spelling or punctuation is interfering with comprehension.  Listening to a story as it is intended to sound eliminates those barriers to comprehension.

I am proud of my third graders.  Each day they are becoming more independent writers.  I believe the secret to their success is that the students understand the flow of our writing workshop and, thanks to clear success criteria, they can identify their strengths as writers.   They see themselves as writers!   I am fortunate to have access to audio technology.  In reality, you don’t need computers or even headphones to make this happen in your classroom.   You can go “old school” with a mini cassette recorder.   Some old cell phones have recording devices.  One of our goals is to teach our writers to write like readers and read like writers.  Using audio is one way to get there!

Photo of Tina Ginglo

Writing Workshop and Technology

I am pleased with how our third grade writing-program is evolving this year.  Students are at the point in the term where they are working independently.  They know when they need to meet with their writing partner.  They know when they need their laptops.  They are learning how to publish their personal narratives using Microsoft Word, and use tools such as grammar and spelling to edit their work.

Our writing workshop is a simple process.  First, all writing begins in the Writer’s Notebook.  As I mentioned in an earlier post, I began the year introducing students to the narrative genre with  “small moments.”  Small moments are short pieces of writing that use action, dialogue and thought/feeling sentences.  I provided writers with a number of strategies for generating ideas for writing, providing time for writers to practice each strategy. After several weeks of practice, I then introduced longer personal narrative writing.  Students have a strong understanding of the success criteria for personal narrative writing.

Success Criteria:

You have written an effective personal narrative when:

  • your story has a beginning, middle and end;
  • the main character tells the story using the personal pronoun “I”;
  • you have included action, dialogue and thought/feeling sentences;
  • your story is a “seed” story, not a “watermelon” story;
  • you have correct spelling and punctuation.

Those familiar with the Lucy Calkin’s Units of Study resource will recognize the idea of small moments, seed stories and action, dialogue and thought sentences.

When writers feel they have finished a piece of writing, the next stage in our writer’s workshop is for writers to meet with their assigned writing partner.  I decided to match writers who are writing at the same stage of development rather than pairing stronger writers with more dependent writers. This way each partner will benefit from the feedback they receive.  Writing partners refer to our success criteria when giving feedback to their writing partner.  I expect writing partners to provide two “glow” comments and one “grow” comment to their partner when they meet.

Following their meeting with their writing partner, the writer begins their first revision.  Most students choose to type their narratives on Microsoft Word.  As they begin to publish their narratives, they make revisions to their first draft, keeping in mind the feedback they just received.

In addition to meeting with their writing partner, I call writers for writing conferences each day.  I usually wait until writers have completed their first revision on their laptops.   I decide on a teaching focus, for example, using correct punctuation when using quotation marks, for our conference.  A writer will walk away from our conference with a skill to practice as they continue to revise a piece of writing or when they begin a new piece of writing in their Writer’s Notebook.

For many, the most exciting step in writing workshop comes next.  After writers have revised their personal narratives, they log in to Edmodo.com and post their narrative in their assigned writing group.  I have created five separate writing groups on Edmodo.com.  There are four to five students in each writing group.  These groups are more heterogeneous.  When writers post their narratives in the writing groups on Edmodo.com, they ask members of their writing group as well as their teachers for descriptive feedback. It is the responsibility of each writer to read their colleagues’ personal narratives and provide them with descriptive feedback in the form of glow and grow comments.  Students’ writing partners are not assigned to the same writing group.  Therefore, each writer in our class receives descriptive feedback from five to six of their peers as well as their teachers!

We are now at the stage where writers are reading their feedback on line and returning to their posted piece for a second or third revision. They then repost their narrative to share with their group members.   Ideally, I would like my third graders to learn how to leave a piece of writing.  They can start a new piece in their Writer’s Notebook and perhaps return to earlier published pieces later in the year.

Edmodo screen capture

Integrating Edmodo.com into our writing program revealed additional benefits I didn’t anticipate.  Edmodo is basically acting as our class’ private server.  Students can access their stories from any computer at school or at home.  This eliminates the need for flash drives.  If students want to work on a piece of writing at home, they simply log into Edmodo.com.  I also have easy access to student writing. I can provide feedback to students at my convenience without having to carry writing folders.  Parents can also see what their child is writing at school.  When parents log in using their assigned parent access code, they only have access to their child’s posts.

Writing Workshop Flowchart
I promise that not all my posts will be about Edmodo.com, but it is really exciting to see students engaged in the writing process.  It is amazing how this technology enriches our writing workshop.  However, our writing program is not dependent on technology. If the technology were to disappear, our writing workshop would continue, just less efficiently.
Photo of Tina Ginglo

Equity and Access to Technology

I am committed to equity and inclusive practice.  Each day I “check in” with myself and ask those important questions:  Do all my students feel included in the classroom?  Have I excluded any students from the learning I have planned today?  With technology these questions are particularly important to consider.  In particular, I want to address the concerns around students’ access to computers.   As I mentioned in my last blog post, my students and I are fortunate to have unlimited access to technology, specifically, laptops, wireless Internet and digital cameras.  Access to these tools presents us with endless opportunities to make learning meaningful and engaging for students.  The students are so excited about learning.  They want to take their flash drives home to work on writing projects and they log in from home to contribute to their Edmodo groups.  However, there are some students who don’t have computers at home.  What about these kids?  These students can quickly feel left out if they are not part of the “virtual” in-group, so how can I make the most of the technology I have and not marginalize any of my students?

I have been working closely with one of my mentors since October.   He has helped me create a vision for my class use of computers.  I want to get my students to the point where they decide when they need the computers and when they do not.  At the beginning, I had all the control.  I directed students when to take out the laptops and when to put them away.  In the first few weeks, you could walk into our classroom and see all the students working on their laptops at the same time, doing the same thing, like a computer lab.  This didn’t feel right for me.  Now, more often, you could walk into our classroom and see some students on laptops, some not.  The students using laptops will likely be doing different activities.  A few may be logged on to Edmodo contributing to their discussion groups, some may be working on a second or third draft of writing, others could be reading or doing research, while others could be engaged in  an on-line lesson from Ontario’s Education Resource Bank.   I believe that this kind of  learning environment helps students develop independent work habits, increases student engagement and by allowing students to have some control and choice in their learning, I hope to see an increase in student achievement and a decrease in classroom management issues.  I also believe that such an environment will allow all students to participate in and  keep up with on line learning during the school day.  It may not completely resolve my access concerns, but I am sure it helps.

Photo of Tina Ginglo

Introducing a New Tool for Learning Takes Time and Patience

I have been absent from Heart and Art for too long!  I have not forgotten about our followers or my fellow Heart and Art bloggers, but I have been distracted with a new challenge.  Last spring, I successfully wrote a proposal requesting laptops for our third grade program.  In mid October the laptops arrived, and since then I have spent every spare moment working to integrate this new learning tool into the heart and art of my teaching and student learning. I trust that my absence from Heart and Art has not been in vain. It is my intention to share my new learning and growing pains with Heart and Art followers.   I hope that Heart and Art followers will benefit from my recent “distractions.”   Each month I will share how the third graders at my school are taking ownership of their learning and growing more independent as they use technology as a tool for learning.

The proposal I drafted commits my students to collaboratively generate inquiry questions that connect to the science and social studies curriculum. My students have begun to use laptops to mind map their ideas and questions using off-line software.   We have just started to use MS Office software (Word or Excel) to keep track of their jot notes and sources and the plan is that they will share their research through meaningful projects such as scripted video documentaries (Windows Movie Maker), scripted video/podcast how-to guides (Audacity), digital scrapbooks, pamphlets, or public service announcements.   I have recently connected with a grade 12 Media Studies teacher who teaches at our feeder high school. We are discussing the possibilities for doing a project together. I really hope this pans out!  You can trust I will share our learning on Heart and Art!

We are at the early stages, but my students are starting to share their inquiry questions, research and new learning using Web 2.0 tools.  For example, I have created a teacher account on Edmodo.comIt is FREE!  All my students have created student accounts and they now use Edmodo to share ideas and new learning with each other in school as well as from home in this secure educational social media site.  I started by simply posting questions students to consider and discuss on-line.  To date, I created three groups for my students to join:  Science, Social Studies and Room 204- Announcements.  I will share how I use the Announcements group in another Heart and Art blog post.  I am interested to learn how other primary teachers are using Edmodo in their classrooms.  I am following a number of teacher groups on Edmodo, but most of the contributors are junior, intermediate and secondary teachers.  I do believe that Edmodo has its place in the primary classroom as well.  I will post the different ways I am using Edmodo in future blog posts.  My next Edmodo project is to take my literature circle groups on-line.

Obviously, there is a skill set that my students need to possess in order to conduct research and use spread sheets and flow charts to record their learning.  It has been a slow process.  Although most of my students have computers at home (19 of my 22 students have access computers and Internet at home), their keyboarding skills, ability to save their work and access files is limited.  There are times when I think to myself, “This is consuming so much time!”  But I am committed to using 21st century tools in my classroom and to creating an environment where students learn with and from each other within the walls of our classroom and beyond the walls of our classroom.  When I get frustrated, I just tell myself to “Trust the process!”  I hope to join an international project as well this year…all in time…one day at a time…stay tuned!


Photo of Tina Ginglo

Sharing Personal Narratives

I am a big fan of Lucy Calkin’s Writers’ Workshop.  I have seen it in action in many classrooms and I couldn’t wait to implement it in my own program.  I started using writer’s notebooks last year with some success, but I wasn’t satisfied with my writing program.  I decided to give it another go with this year’s group of grade 3s and we are off to fantastic start!

Students love having their own journals for writing.  During the first few days of school, we covered their notebooks with colorful paper and I allowed students to decorate their covers.  I loved seeing messages such as PRIVATE KEEP OUT and PROFESSIONAL WRITER’S NOTEBOOK written in big letters on the cover.  In Calkin’s resources, she recommends that you begin the school year writing personal narratives through “small moments.”  Small moments are short narratives where students write about something they did with a special person or in a special place.   I have not had one student unable to think of something to write about! Students know they are to write for 15-20 minutes each day without interruption.  They understand that we must be quiet so we can think about our writing.  They love sharing their writing in Writers’ Circle and with their peer editor.   Almost daily, I will photocopy (with permission from the author) a student’s small moment.  As a group we identify strengths in the writing.  I then use the student’s writing to teach a specific craft in writing such as adding dialogue or words we could use instead of “said.”

We are now focusing on “zooming in” when writing our small moment.  Students are encouraged to use three types of sentences in their writing: action sentences, dialogue sentences and thinking sentences.   They are starting to get the hang of it.  Here is one grade three student’s small moment:

I opened the square box and smelled. “Mmmmm,” I thought to myself.  “You better grab a slice before I eat all the pizza Tatiana!” I warned.  

By S.B. 

It seems so simple, but it does take students a while to get the hang of it. Three sentences that capture what Lucy Calkins refers to as “seed” ideas rather than watermelon ideas.   Once students get the hang of writing these short personal narratives, they can start to write longer personal narratives.  Our goal for the first week of October is for students to take one of the small moments they wrote in September and develop it into a longer personal narrative.

These personal narratives complement the reading resource I use in my classroom.  The first unit in Nelson Literacy grade 3 is personal narrative or My Story.  Reading as Writers, Writing as Readers…it doesn’t get better than that!

Photo of Tina Ginglo

What a Difference A Year Makes

This time last year I had just returned from a seven-year absence from the classroom.  During the seven years I was working in various centrally assigned positions, I had many opportunities to visit K-12 classrooms across the Greater Toronto Area.  You could imagine my excitement!  I observed many effective lessons and teaching strategies, classroom set-ups and routines.  I couldn’t wait to adopt some of them for my own program.  As well, I felt my literacy and numeracy program in my last school and teaching assignment was effective and I planned on resurrecting many of those strategies and routines with my new group of students in my new school.

September 2011, I was teaching a new grade (grade 3) in a new school community. I expected my classroom management to be a tad rusty and it was, but there were many initial problems that I could have avoided had I not taken some things for granted.

Prior to leaving the classroom for central positions I taught grades 4 and 5 for more than half my teaching career.  I provided prep coverage to grade 3 students over the years, but I never had a third grade teaching assignment.  I expected grade threes to be similar to my grade fours in terms of social emotional development and their ability to work independently.  After all, it’s only a year difference…what a difference a year makes!    The students were so “little” compared to my grade 4s at the beginning of the year.  I started the year with the mind-set of a junior teacher. I didn’t expect that I would have to model routines such as using the pencil sharpener!  This year, I began the year thinking like a primary teacher.  I take time to model the simplest routines, over and over and over again.   My expectations are more realistic.

I believe in collaborative knowledge building.  My classroom set up has always reflected my beliefs about teaching and learning.  In my last school, I didn’t have desks in my classroom.  I had 6-8 tables and I never seemed to have a problem getting students to work both collaboratively and independently in this setting.  Naturally, when I was setting up my classroom last summer I immediately placed the individual student desks into groups of 4.  The fact that most, if not all, of the grade 2-7 teachers in the school arranged their desks in pairs didn’t register.  Sometimes I need to be hit with a brick to get a message.  My students were not ready to work in groups.  By the end of week two, my classroom looked like all the other classrooms in the school, with students sitting in pairs in long rows.  I hated it, but the students were more settled and were better able to focus.  I managed to finally get them into groups of four when we returned from March Break.

On the first day of school, I did my usual spiel about making smart choices.  I told the students that they could sit wherever they wished as long as they were responsible in the choice they made.  I warned students that if I felt their choice was interfering with our learning I would move students.  This always worked for me in the past. Of course I had to move students around, but it never was a disaster.

This year, I started the year with the students sitting in rows of two per group. I purchased three sets of calendar numbers and taped them to student desks, coat hooks and cubbies.  When we entered the classroom on the first day of school, I invited all students to stand at the front of the classroom.  I quickly reviewed odd and even numbers with the students.  I then invited the boys to hang their bags on an odd numbered hook, pick up their name card, and sit at the desk with the same number as their coat hook.  Next, I invited the girls to find an even numbered hook, pick up their name card and sit at the desk with the same number as their coat hook.  There were no problems at all.  I have groups of two, boy-girl groups.  I have shuffled a few students around, but it really made the first day, first week, first-month of school more structured and settled.  I think it is a bit of a compromise on my part.  I want to keep to my belief that students should have choice and control in the classroom, but at the same time, taking the pressure off of the students who are not ready to make those types of choices right now.  What a difference a year makes! 

This number system really makes planning for supply teachers and lining up so much easier as well.  Instead of having a floor plan prepared for supply teachers. All I need to do is leave a list, 1-22 with each student’s name beside a desk number. I can move the furniture around and not have to worry about updating my floor plan, just as long as I update my class list with desk assignments.  Students also know they must line up in their numbered order.  All their teachers have a copy of our class list with their desk assignments.  It has made transitions so much easier on teachers and students.  What a difference a year makes!

In the years I was out of the classroom, I guess I took for granted all the structure, the little details, that did exist in my past classrooms and the classrooms I visited that would go unnoticed by visitors.  Structure doesn’t necessarily mean that we are taking choice and control away from the students.

Photo of Tina Ginglo

Another good resource for teaching the Arts curriculum

Some time ago I shared a great website resource for  drama and dance lessons and units- http://code.on.ca/resource

I have another favourite on line resource created specifically for Ontario teachers.

Learning Through the Arts hosts dance, drama, media arts and visual arts lessons based on the revised Arts curriculum for Ontario teachers.  I like that I am able to watch the integrated arts lesson unfold with real students.  You can browse by division or by subject.   I am going to attempt the third grade animal legends unit in May.   I hope you find this resource as useful as I do!