TED Ed

TED Ed in the Classroom

I’d like to share, what is probably, my favourite on-line and in-class instructional tool – TED Ed. And since 2013, it has been front and centre in my classroom. TED Ed you wonder – it’s like TED Talks right? Kind of yes and not exactly. Although I use both at my school, there are some differences.*TEDEdClubLogo1920WhiteBG (1)


It all started in 1984

Last year, I shared TED Ed with alot of educators. So to break the ice, I begin by asking them to guess what TED stands for? Most people respond with Technology, Education or Engineering, and Design. Those happened to be my guesses too, but the ‘E’ in TED, stands for Entertainment. Since those first talks in 1984, tens of thousands of speakers(students included) have stood on the dot and shared their ideas worth spreading which are both entertaining and educational.

The Ed or education component is a relatively recent addition, but it is quickly becoming a phenomenon that is uniting educators around the world.

TED Ed Clubs

Out of the incredible talks and desire to connect educators around the world with one another, the TED Ed Club and TED Ed Lesson platforms were developed. Now teachers have an opportunity to curate, create and share lessons with a global cohort of educators and learners. What’s incredible is that students can access and contribute to the lessons too.

So far this school year, I have shared lessons with high school students in Poland, connected with TED Ed Club leaders and students in Zambia, and worked welcoming new club leaders from Syria, India, and here in Canada. From these experiences we support one another, while encouraging students and educators to discover their passions, find their voices, and develop important presentation literacy skills.

Through TED Ed Clubs in my school, students cultivate ideas, learn to organize and express them and then present their talks at number of opportunities throughout the school year. Some talks are even shared, with permission, on the TED Ed YouTube Channel.

TED Ed Lessons

Whether it is for mind’s on activities introducing new subjects, or I have created and shared over 50 lessons using their free lesson editor. It starts with an idea, and then another one, and suddenly there are ideas spilling all over the desks, into the hallways, and out the doors of the school. Simple right? Did I mention it was free?

With a certain lens. I’ve discovered the magic occurs whenever I am able to find out what interests students as I plan my instruction. Armed with that knowledge, I can then create or bookmark lessons to spark curiosity, broaden understandings, and encourage digging deeper.

In fact, one of my favourite parts of creating a TED Ed lesson is filling the Dig Deeper section with resources and additional lessons, images, and points of view. I even post music videos as a soundtrack for some. The feedback has been overwhelmingly positive from students and parents. I hope you take the time to explore TED Ed and are able to use it in your classroom. If you create a lesson, please share it with me.

If you’d like to learn more about TED Ed, please message me in the comment section and I would be happy to share. In the meantime, click on some of the links. One of them is the current Prezi I share with educators for PD.

Thank you for reading.

* When I was starting out in French Immersion, the subtitles in TED Talks allowed me incredible access to fascinating digital content, while honouring the need to maintain a focus on French language learning. Now, I am trying to gather like minded educators to contribute lessons to be shared for French Language education. Please leave a message in the comment section if you are interested in joining me.

Ontario Student Record Search

Wow, we are already into the second month of this school year and I am not sure I really know my students very well yet. I have a working idea of who they are as students and as people but need to gather more information to help me with my programming. That is where using their Ontario Student Record (OSR) can help you gather further data to assist me  in this process.

I typically do not complete my OSR searches until after the first month of school so that I can establish my own opinion about them as learners. The OSR is a cumulative record of them as a student since their entry into the Ontario education system. It is a legal document that travels with them from community to community and school to school in Ontario. It is a valuable tool for any educator who is working with a student.

There is a wide variety of information that exists in a student’s Ontario Student Record. First and foremost are the provincial report cards from their time at school. It is here that a teacher can gauge where a student has typically performed in the various curriculae. In addition there is often a wide variety of other sources of information specific to that student. For example, there could be documentation around outside supports such as occupational therapy, early intervention, psychological assessments, legal documentation around custody, Family & Children Services involvement, suspensions, Individual Education Plans and Safety Plans. When you look at the back of the OSR you can see a history of whether a student has had a stable education in one school or whether their circumstances show multiple schools with little or no stability. I have had one student who was entering into his 8th school and he was only in Grade 4.

There is a combination of hard data as well as data that has a subjective component and is based on the interaction and opinions of adults. It is important to differentiate between the two. I am not saying you should discount in any way or ignore that data, but rather understand that the circumstances in which that data was obtained may have been affected by many outside factors. For the student who was entering into his 8th school, his OSR showed that he had difficulty making friends. That data was accurate but was also impacted by his inability to be in a single place long enough to establish friendships or the fact he knew if he did make friends, he would probably be moving soon.

The OSR search is most valuable to me for my at risk students. Students who I know come with challenges either from an academic or behavioural standpoint are the first ones I search, as they demand my attention immediately. When I have a firm understanding of what level of achievement my students are displaying I then look at previous report cards to help me. If for example a student is obtaining a lower mark in mathematics then what has been previously reported it prompts me to further examine my assessment data to ensure my determinations are aligned with my criteria.

It is important to familiarize yourself with the proper protocol of what goes in an OSR, who can access an OSR, where that OSR can be viewed and the responsibilities a teacher has in regards to filing information in a student’s Ontario Student Record. A really rewarding aspect of doing my OSR searches is that I get to see how they have changed over the years with their annual photo. I have attached a template that I use when completing an OSR search.


scan

scan-1


Tech Talk

I would like to share a new initiative my class is starting at our school Ancaster Meadow.

Our class realized the large need for technology in the classroom. We noticed that students are sometimes unfamiliar with apps that are available for completing work and for presenting learning. We are starting a new program called “Tech Talk” where as a class we travel to classrooms and instead of “Reading Buddies” we will assist the class one on one with apps of the teacher’s choice. We came up with a benchmark of five:

  1. Explain Everything
  2. Kahoot
  3. Weebly
  4. Pic Collage
  5. Prezi

These apps will be explored in detail by my class so when we visit our first class after the break, the break off sessions will be smooth and very productive. We will offer this program to grades two-five and speak to teachers before regarding sign up. Students will be able to explore the apps, prepare a small task and then share it with the whole class. The sessions will be fifty minutes long as that is how long a period is in our school. We hope that students will learn from each other and that everyone will be able to use these apps in the new future. I hope it will be a meaningful experience for my class to teach younger students skills that they already have. I cannot wait for our first trial after the break. I encourage everyone to try this  “Tech Buddies” program and share your experiences as well.

Photo of Lisa Taylor

Bulletin Boards – Teaching Tool, Art Gallery, or Wallpaper?

Every classroom has bulletin boards, some have one, some have 10! It all depends on the space you have and how you plan to use it. It is easy to set something up with plans for it to change or evolve, only to find that 4 months later you haven’t touched it, taught to it, or even referenced it!!

In my experience, Bulletin Boards end up falling into 1 of 3 categories: Teaching Tool, Art Gallery, or Wallpaper. Some bulletin boards are a blend of two or even all three of these categories. It is important to make the most of the space you have on your walls, while being cognisant of the fact that many children find too much stuff on the walls to be distracting.

When planning your walls, make sure you check with health and safety regulation, as many school boards have a maximum percentage of walls space that can be covered to stay within the fire regulation. So before you hit pinterest for some great ideas, make sure you are even able to cover the space! In my classroom, I have 5 large boards that cover almost every space that isn’t blackboard, windows or doors. The space that the bulletin boards cover is actually above the maximum percentage I can have covered in paper!! So I can’t paper back my boards as it is a fire hazard.

Many teachers like to paint their boards so they look crisp and clean all year. Again, double check with health and safety, as it is often an issue as it adds weight to the board which might not have been considered when mounting it. Especially if you are the 10th person in the classroom to paint them because the previous colours didn’t suit anyone’s decor!

Once you have established what your health and safety guidelines are, you can start to think about what is going on the walls. Ask yourself a few questions before you put something up there.

1. How will this help the students? While a Word Wall CAN help students, if you slap it all up before school starts and casually refer to it from time to time, it is not a useful tool and it is just wallpaper. Make sure you teach to it. Make it with the class and do it organically!

2. Is this something we need up for more than just today? If you only need it for the immediate future, don’t make a whole board of it. If you want to show off student work, I find the hallway is the best place for this type of thing. It gets more “traffic” from other teachers/students/parents, and it isn’t a distraction to learning. If you do need it for more than just today, you may want to ask a few more questions before you decide where to put it!

3. Do I need to put it all up right away and on my own? As teachers, we hate to look or feel like we aren’t organized, prepared, and ready to go! I recall as a young teacher, putting up bulletin boards before the first day of school. Yes, sometimes I taught to them, but generally they were just wallpaper. Many of us are guilty of putting up the whole word wall kit the day we get it! It just looks so pretty when it is done! Put it up gradually, and with the class! This will make it a more meaningful teaching tool. As teachers, we like everything to look complete and not “in progress” – but having the word wall with just 3-4 words up in September is what your students need!

4. Am I done with this? If you aren’t using it anymore, and the kids aren’t, take a picture of it and take it down! The more “stuff” you have on your walls, the harder it is for students to find what they are looking for. If you don’t need it anymore, take it down!

5. Are the kids using this? Even when you read the research, do the work, cut, past, laminate, and put up a beautiful board, the kids may not respond to it and it may not be useful to them. If you put up a board for math showing single digit addition strategies to start off the year, if they have all mastered it by December, they probably aren’t using it anymore. We have a tendency to keep things up in lieu of blank space to avoid looking like we aren’t accomplishing anything as a class! If they aren’t using it, take it down, or teach to it more, modify it, model how to use it. If after teaching to it more, they still aren’t using it – TAKE IT DOWN!!

There are thousands of blog posts and pinterest boards dedicated to amazing bulletin board ideas. Before you put one up, make sure it is actually something you need, that will get used, and that you install it in such a way that the students know how to access it.

There are great blog posts about what to do with your bulletin boards when you are done. My personal favourite is to snap a picture and create a bulletin board binder. That way, if there is still one of two children in the class that still need that bulletin board, they can go to the binder and look at it all year long! It will also serve as a nice reminder of how they looked if you end up needing to recreate it another year!

Teaching Math


I have always considered myself more of an “English Language” teacher. So, when I moved into the junior and intermediate classroom, I felt less confident in my abilities to teach math. When planning for the year, I surveyed some other junior/intermediate teachers for recommended resources. And when planning for the classroom environment, I made sure to have a corner dedicated to math, which includes a gallery wall, manipulatives, math dictionary and texts as well as tools like calculators.

Although I was given a set of textbooks, I don’t plan or teach from the textbooks. I print the curriculum expectations specific to the grade for each strand, and use them as my guide in planning the units. Then I refer to some other resources for ideas in activities that involve group work or problem solving. Some of favourites to support my math program are:

  • Introduction to Reasoning and Proof, Grades 6-8: The Math Process Standards Series, by Denisse R. Thompson and Karren Shultz-Ferrell
  • Nelson’s Ontario Numeracy Assessment Package
  • Good Questions: Great Ways to Differentiate Mathematics, by Marian Small
By referring to these resources, I am able to understand the concepts that need to be taught and how to differentiate using broader questions for the range of math learners in my classroom. I enjoy providing mini-lessons on strategies to support the students as well as encouraging them to share their strategies with me and the rest of the class. Our math class has become engaging and interactive, not repetitive and boring as I had feared.
We use a gallery wall to display group answers to problems. This has become an invaluable way to quickly assess understanding. Students are given the opportunity to view the gallery, see how others have solved the problem, respond with their own ideas or suggestions and acquire new learning. A week of math classes includes a range of instructional strategies, independent work, paired and group work. One of our common “go to” questions is “Does this make sense?” We are aiming for understanding rather than rote learning of facts and steps (as I learned in elementary school). So, I am enjoying learning with my students as I discover new ways to approach and solve math problems.
Photo of Lisa Taylor

Using Twitter in the Classroom

Sure, Twitter can be used to find out what Kim Kardashian had for lunch today, but it can also be used to connect classrooms, teachers, and school communities.

Today I am going to talk about connecting with your families and students through Twitter.

Twitter is a powerful tool if used properly. The first step is choosing a “handle” (or name) that isn’t already taken. Remember there is a limit of 140 characters in a tweet, so don’t make your name too long! You might also want to make your name somewhat generic and not directly related to the specific class/school you are at, as that may change next year! Go with something that is specific to you – @TaylorsClass @LearningRules @ClassroomFun @EduFun. Choose something that you can take with you to your next class, your next school, your next experience. It takes a lot of work to build followers and to develop a good collection of people to follow, you don’t want to have to start from scratch each year.

If your goal for this twitter account is just to post stuff to the parents and students in the class, it might be wise to make it a “disposable” account and make it specific to that class and year so you can change it up each year. You might wand a more specific handle: @TaylorGr2_2014 @learning2015 @gr2FI14 – again, be creative!

Once you have settled on a handle, you need to get followers. You don’t necessarily need lots of big name followers for this account – your goal is more to connect your classroom community, possibly connect to other classrooms, share what your class is doing with your school, board, and PLCs. You can do all of this by sharing our handle with those who you think would benefit from seeing the information you are sharing.

Before you tweet, double check the guidelines in your school board around posting student work, names, pictures, etc. Don’t post pics or names of students or their signed work without parent consent.

Even without pics of students, you can still share lots of valuable stuff on your twitter feed. You can tweet text explaining what you are doing, questions that parents might want to ask their kids about what they learned today, agenda messages, reminders, etc…..the list goes on!

Twitter can also be used to connect to famous people. We used to write letters to authors, but now we can tweet them! I have had students write stories in the style of Mo Willems and then we tweeted them to Mo (@MoWillems) and Pigeon (@The_Pigeon) for them to see what we had been working on! We sent Canadian Astronaut Chris Hadfield (@Cmdr_Hadfield) tweets from each of our grade 2 students the day he left space, thanking him for everything he did to educate and inform us while he was up there! Twitter really does make the world a lot smaller!

As a teacher, I have tweeted what my class is doing and it always feels great when parents, other teachers, admin, or anyone really, comments on what we are doing! We often share questions we have, the “I wonder” questions that come out of inquiry – Twitter is an excellent resource for expert knowledge.

If you decide to use Twitter in your classroom, make a point of tweeting at least once a day. Even it if is just to say that everyone is having fun today! I like to print pages that have 140 boxes and teach my kids to write “tweets” about their day and then I will type them in at the end of the period, day, etc. We also post those 140 box sheets on the wall on our “twitter feed” so other classes can see what we are up to!

Twitter seems to be sticking around. We might as well embrace it!

Photo of Lisa Taylor

Behaviour Management – is there one magical system?


How you decide to manage behaviour in your classroom will in the end be up to you. There are many, MANY blogs about the topic, and many are worth reading, if not to get great ideas and resources, but to hear about what not to do! Pinterest is full of links to blog posts, posters, resources, etc., that you can use in your classroom. In the end, it will depend on what you are comfortable with, and the group you have.

When I first started teaching, I tried a marble jar. I made the mistake in my first year of taking marbles out when my kids were misbehaving and this was an awful mistake on my part. I totally lost their trust. If you use a system where you give something, if at all possible, don’t take it back. They have earned that and no future behaviour should impact past positive behaviour.

There is more than just a marble jar out there now! I am going to list a few systems I have used, and some I haven’t. Keep in mind that each of these systems needs to be rejigged to fit your own needs for your teaching style, and the group of kids you are working with.

Class Dojo

Class Dojo is a digital app that is great for tracking behaviours and students and parents can check their progress from home. If you are absent a lot (I was often out on union business, personal illness, and supporting an ill child), it is a great system as you can leave it for

an OT and you can “check in” on your kids and see how they are doing throughout the absence. You get to choose a monster/alien/creature for each student. When I created my class the year I used this app, I chose one colour for my high fliers. I didn’t tell the class this, but it was an easy way for the OT to remember what students needed more positive reminders.

The thing I don’t like about Class Dojo is that it is a token economy where you can give and take points away. Students can actually be in the negative. This is very discouraging for students. It has always been my philosophy that if a child has earned some positive reward of sorts, that they should keep it. If you feel this same way, this app might not be for you, or you would just not use the deduct a point feature.

I have also used this app to track behaviours (secretly – not as a whole class management system). I had a student who was struggling with several severe behaviours – hands on, calling out, personal space, etc. We set him up on Class Dojo and the EA that was in our room would track with positives and negatives as it gave us an excellent print out of his trends. You can change the “behaviours” that it starts with, so you can make them as specific as you need. We even changed one to keep track of ticks in another student.

“Pick Me” Coins

A few years ago I read a blog post about a coins system that I used in my Grade 2 class and absolutely loved! Here is a link to the blog post  – I numbered my students, got some counters (many schools have these in great abundance, but you can get them from most education stores for about $5-10 for enough for the whole class). Each time I saw someone doing something awesome, I would give them a “Pick Me” coin. They would then get to put it into my “Pick Me” bin. I just used a small spaghetti sauce container, or pizza sauce container. Something that will fill up quickly and make a nice sound when you shake it. That way my kids knew I was on the lookout. They put their coin into the draw and then whenever I needed a helper or helpers for anything – attendance, hand things out, collect things, water the plants, run something to the office, etc., etc., etc., the list truly does go on, I just drew a number. This was awesome for two reasons – 1. I never remember to change the “jobs” on the job chart and then the one kid in the class that is on a sucky job like sort the garbage complains relentlessly and you feel awful; and 2. There is never any need to pick anyone for anything and have to think about who has been doing a good job, etc. The system does it for you. My only added rule was that they had to be on task when I drew them. If they weren’t, their number simply went back into the draw for next time. I would empty the “Pick Me” jar at the end of every week.

This is also how I taught my entire probability unit!

I even started letting my kids nominate each other for Pick Mes. I made a form up and they could fill it in and submit it to me. I introduced it during persuasive writing and it was a huge success – and a great way for my kids to start to look for the positive behaviours in others!

This was an amazing system and my class loved it. The second year I did it, my Grade 2s did not buy into it as much and I had to use something else entirely. Every class is different.

Stop Light

My daughter is in Grade 1 right now and she comes home every day saying, “I was on Green all day!” – her class is doing a stop light system. My understanding, from my 5 year old, is that when someone makes a bad choice, they move down to the yellow light, and then down to the red light. “When someone makes to to the red light, Mme calls home!”

Clothes Pin Charts

I have seen variations of the clothes pin names moving around. The thing I am not crazy about with clip charts, is that it really singles out the kids who struggle. Those 
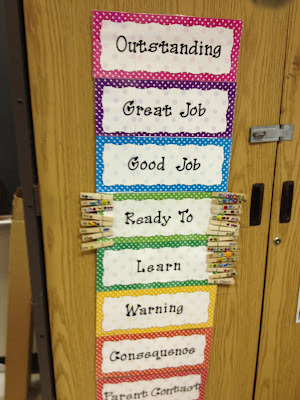
kids who have IEPs and behaviour plans are going to really lose out in this system. It is really easy to get discouraged and give up if you know that every day you are going to end up at the bottom. Set those kids up for success – catch them doing something awesome to move them up as often as you can to start the momentum early. If you can get them moving toward outstanding early in the day, you will be less likely to end up at Parent Contact. If you leave it to them, they will likely end up at the bottom.

NOISE and Decibel Reader

I used this idea for snack time mostly. Put the letters to the word NOISE up on the board. Erase a letter each time the kids need a reminder that it is getting too loud. When it gets to just NO – that means there is NO Talking. It took a few times for them to get to the No Talking part to realize they needed to keep it down. I have paired this with an app that shows the decibels of the room so the lunch helpers don’t have to guess, and have just given them an upper range and when the class goes over that limit, take down a letter. I project the app on the screen so the kids can see where they are as well – add a little science to their snack time!

When it comes down to it, there is no one perfect behaviour management system. Your behaviour management system won’t solve your classroom management problems on its own. It is all in how you use it and manipulate it to serve your purpose. Keep in mind that positive reinforcement is far more effective than negative.

Useful Resources for the French Immersion Classroom

As many FSL teachers will attest, finding resources for your French classroom – especially, I find, an immersion class – is a challenge. It’s difficult for established teachers, so for new teachers, it can seem like an impossible feat to find resources with the right mix of content and language for your students.

The program I teach – Middle French Immersion – isn’t a common one in Ontario. My students start French Immersion in Grade 4, with their only English instruction being in English Language Arts (40 mins/day) and Mathematics (60 mins/day). While most of them will have had exposure to French via Core French classes since kindergarten, it is still a big adjustment to go from primarily oral communication-based learning to a program where you are expected to read and write regularly, including scientific texts.

Luckily, we live in the internet age! There are SO many resources available on the internet. Some are better than others, and some I would avoid entirely, but throughout my first four years I have found a few excellent tools that I have used every year.

Without further ado, my list of useful resources for a French Immersion classroom:

1) Word Reference – This site trumps a physical/paper French-English dictionary every single time. When you input a word, it provides you with a list of options to choose from depending on how you meant to use the word. Context is KEY to using the correct word in French, and English has a bad habit of using one word for 15 different words in French. The sentences/examples for each option are incredibly helpful to my students.

2) Bon Patron – A little trickier to use with beginners but invaluable for experienced students in French, this site will allow students to input typed text and have it check their writing for spelling and grammatical errors. It doesn’t fix the errors for them, just guides them in the right direction so that they can fix it themselves. I’ve seen a marked improvement in my students’ writing since teaching them how to use this site.

3) Duolingo – This is both a site and an app available for iOS/Android. This site allows students to practice a variety of French skills and earn “rewards” (similar to IXL, the Math practice site) as they progress through the levels. It’s great to use as home-based practice. Because many of the activities are user-created, there are some small errors here and there, but overall it’s very well done.

4) Brainpop – A useful website for exploring scientific concepts with your students! The language used is somewhat advanced for my Middle French Immersion students, but it was certainly accessible to my Early French Immersion students when I taught EFI a few years ago. There are subtitles available for the videos, however. Lots of interactive activities/lessons on this website!

5) Reading A-Z – This may not be a free resource, but I have found that the $100 yearly membership fee is worth it for access to all of the levelled readers available on this site. My classroom library expanded significantly when I signed up for this site, allowing my students more variety and choice when bringing readers home. These are also MUCH cheaper to replace than the significantly more expensive GB+ books.

6) TumbleBooks – Your local library likely has an account with TumbleBooks that you can access for free. This site has many picture books available for you to listen to/watch. I’ve used this site as part of my home reading practice in the past. Students like having the opportunity to do something a little different (i.e. listen to reading via TumbleBooks instead of reading out loud to a parent) from time to time.

7) TeachersPayTeachers – There is a growing FSL community on the TeachersPayTeachers site, an online marketplace where teachers can post resources they have created and others can buy and download those resources. While it takes some sifting through to find the really good resources, I’ve found many great language centre activities on TPT – especially this year!

There are so many other great resources out there and I could go on and on, but those are the sites I visit/use most often in my teaching. I hope at least some of them are useful to others out there – and if you know of any others, leave a comment!

Photo of Lisa Taylor

Long Range Plans – Are they ever really done?

Some teachers dive right in over the summer and plan their whole year out! I have never been that kind of teacher. Not only do I not have the patience, I am simply not organized enough to get everything laid out in advance. I find it especially difficult to get long range plans together before I have met my students.

I have tried doing a spreadsheet with a few words in each box to outline what will be happening and have each cell represent a 1 or 2 week block (pictured above), I have tried doing all of the different strands on their own page with the whole year laid out, I have even printed the curriculum document for each strand I teach and cut each expectation out and then paired them with similar expectations (i.e., in Grade 2 Science the students look at the changes of states between solids, liquids and gases, this could be paired with measuring temperature in the Math Measurement Strand, and even volume). Then I tape them all down in groups and go from there.

Last year I went with a template that gives a full 2 page spread with a row of cells for each week. At the beginning of the year, I planned out general ideas for each month/week (i.e., I would focus on data management – graphing for the first 2 weeks, picking a just right book, and writing a retell to be connected to the Social Studies curriculum of Celebrations). Each page started out very general. As the year went on, I could use each page as more of a detailed planning spot where I would go in and “beef up” the plans for that week. Adding in the specifics of what I was going to be doing. I found this was excellent, as it acted as a long range plan and my general daybook. In many cases I would even write in the strands that we had accomplished as we finished them up for my own records.

Handing in my long range plans was difficult, as they were very thin to start. I sat down with my principal and walked him through my plan. I had taught Grade 2 before so I was pretty familiar with where the curriculum would fit together, and I had worked with my grade partner to pair up on some things and make sure we were not overlapping on others (i.e., we didn’t want to both be working on certain strands at the same time as we shared resources, but others we would want to do at the same time to bring our classes together, etc.). My plans were not overly detailed, but they had genera ideas for when I would be working on different strands, etc.. I explained to him that they are not really, “done” yet. He demanded that I finish them and submit them. It took some explaining, but in the end, I was able to create my plans the way I wanted and share them digitally through Google Drive. This way, he could pop in at any time and see where my class was headed and it was always up to date.

Not only did this format work exceptionally well for me, my principal was quite pleased in the end because my plans were the only accurate ones he had by May! We change where we are going with our teaching all the time, it is just what happens in a classroom! You get an email from a local theater company that they are putting on a show in January that would fit perfectly with something you were going to teach in May: you change your plans to accommodate. You find out that they materials you needed for your awesome unit are booked up for the month you were planning to teach it: you change your plans to accommodate. Long Range Plans are as much a living document as any other document we work with! Let it be organic and know that there will be times where you planned to work on something for 2 weeks and at the end of 2 weeks, they still don’t get it! Accommodate and move forward!

Below are some pictures of the plans I submitted last year to my principal as they looked at the end of the year – they were changed A LOT between September and the end of the year! If a box was left empty, it was because I would be continuing what we had started the week before.

At the beginning of the year, the page for these weeks might have said: Days, punctuation, predicting/retell, writing routines, read numbers and locate on number line, and 2D geometry. When I got to that week, I beefed those weeks up a bit, elaborating on what I was going to do each specific week to build on the concepts, etc.

Photo of Alison Board

Assessment and Planning for Reports

Whenever I complete reports, I seem to reflect on the practice of evaluation and how to improve my assessment practices. Here is what I have  noticed:

  • assessment begins when you first meet your students. This provides a starting point, so you can recognize growth or progress. Initial observations may seem too obvious to record, but are often useful at time of the Progress report or the first interview with parents.
  • observation charts made like a grid with the students first names in alphabetical order are my preferred format. I have tried observation notebooks (one for each student) and index cards. The grid observation chart is simple as I can copy a stack and keep on clipboards around the room for quick accessibility. It is also easy to see if a block is empty – ensuring that I am making observations equitably. I also find these observation charts useful when marking. There is enough space to provide a grade for an assignment as well as a quote or excerpt of the student’s work. I then add the sheet to my assessment binder. When writing reports, I can refer to the grade of an assignment as well as an excerpt, which I include as an example for the report – showing how the student demonstrated their understanding.
  • photos are an excellent way to capture student work and refer to during report writing. I have used my smart phone to capture pictures of the students in tableaux, their writing in their notebooks, artwork, collaborative pieces, brainstorming discussions, math activities, and music (video of the students experimenting with instruments). Referring back to the photos and videos provided evidence of student engagement and understanding that I may have missed with anecdotal notes.
In addition to my preferred practices, there is a section in The Heart and Art of Teaching and Learning book (pp 84 -90) that provides practices more specific for Early Years, guidelines and considerations for report card comments, as well as information on IEPs and English Language Learners.