Reflecting on Identity Boxes

In my schedule this year, I had a number of periods where I was able to partner with teachers around the meaningful use of technology. During one of these Assistive Technology periods, one teacher brought up the idea of supporting students on creating Identity Boxes, loosely based on the idea of Joseph Cornell’s Box. The idea was to work with students intentionally on understanding the many facets of our identities and how they intersect, and from there, to create a digital version – similar to James Cornell’s – where students could share their learning about themselves, with one another and their families. 

This past month, I had the opportunity to work with students to start the process of bringing their boxes to life and it’s been a great experience to work with them on using technology as a form of communication. From learning to link Slides and the meaning of symbolism to inserting images and formatting text, it’s been an interesting journey with students as they take their content and try to make it visually appealing for their audience. For me, this experience has reinforced three things: understanding identity is important; use of tech should be taught; and children love sharing about who they are when they know you will listen. In this post, I share about these three things.

Understanding Identity Is Important

Everyone is navigating and figuring out who they are in an ever changing world. Children are no different. At a very young age, they are identifying and learning about the different “parts” that make up who they are. While some are obvious, there are also parts that may be hidden or are yet to be uncovered. I think it’s important to discuss aspects of identity with children from an early age. Through open conversations, experiencing supportive relationships and seeing other people with similar identities being valued, children are able to develop a positive sense of self. 

In years past, I’ve worked on different activities to help students understand the various facets to identity. Depending on the age and the group of students, this work can look very different. The way we might discuss identity with a kindergarten student would differ greatly from a grade 7 or 8 student. Not only that, it would also depend on the work that has been previously done within the classroom to build a community where these important conversations can be had, without causing further harm, particularly to students who are already marginalized.

It’s important for teachers themselves to understand identity and how their own identities impact the way in which they teach and interact with students. As such, I always suggest that teachers take the time to do some of their own learning first. judy mckeown has provided teachers with an excellent resource – Pause and Ponder Social Identity Self-Assessment – that teachers may wish to use for themselves. The questions are rich and call for much reflection on how we navigate the world inside and out of our profession. I don’t think that there is one specific way to teach or do identity work with children – there are a variety of approaches that could be effective – but at minimum, I think it’s important for us to start by understanding what it is and how it influences how we navigate the world. 

Use of Tech Should Be Taught

Children are incredible with tech! I remember when my nephew was 2 and the joy he had on his face when he was able to use his iPad to pull up “Baby Shark” on YouTube. I didn’t think it could happen with him not being able to spell the words baby and shark as of yet, but if you can sing or say, “Baby Shark”, an iPad can find it with ease. 

Armed with this knowledge, I think that many believe that if we just give children a device, they’ll figure it out. Most times they do, but I’ve noticed that in order for tech to be used meaningfully, there needs to be some support with the learning. I mentioned in a previous post that I had the opportunity to partner with another teacher this year around supporting students in developing their proficiency with Google Slides. It was a really great experience because students were able to learn some of the basics that supported their use of tech and allowed them to communicate more effectively. These are skills that not only help for a particular assignment but that can be transferred across multiple subject areas and are skills that can be used beyond the classroom. 

Over the years, I’ve seen many strange and interesting things. Centering a title or the line spaces on text are important skills that students need to be able to understand how to do easily.  I’ve seen some who are excited to hit the space bar until the cursor lands somewhere in the middle of the screen. I’ve also seen students hitting the enter button to be able to double space their text, only to realize that if they change the font, the spacing is all off. These might seem like little things, but they’re also easy to teach kids in mini lessons. 

For the project on Identity Boxes, I helped students: link slides; share their slides in preview mode; and in the creation of collages of their images. Simple things that I don’t think we should take for granted that students will somehow be able to know how to do. Going forward, I really want to be intentional about creating mini lessons for students that support them in being more proficient in effectively using the G Suite for Education Tools. 

Children Love Sharing About Who They Are When They Know You Will Listen

Sitting with some of these students, it was apparent that they were eager to share parts of themselves with me. As I sat, I heard stories of their countries of origin – what they missed and what they brought with them – and also heard students share about the languages they speak and love. Although these are students that I also teach French for one period a day, having them share their Identity Boxes was almost like getting to know them on an even deeper level and it was an opportunity to see them in a different light. I felt honoured that they would share parts of themselves with me, so freely and with such joy. This experience has me thinking about the need to further offer students the opportunity to bring their whole selves to school every day and not just on days where they present parts of who they are. 

Reflection has been an important part of my growth over the years. This post allowed me the opportunity to reflect on one assignment, however, I will be taking more time for reflection and really thinking about what I will carry into next year and what I might just leave behind.

Virtual Museum – Visit and Reflection

Over the course of the pandemic, the importance of virtual options for greater accessibility has become more and more apparent. From meetings to field trips, the way in which we accessed the world changed for a while and I hope that as we look to the future, some of these changes become permanent options as they support a greater ability for more to participate. Although many are excited to be back to in-person field trips, many organizations are still offering virtual field trips. In this post, I’m sharing a resource that I created for students last year that you might find useful to use with students, where appropriate. 

The Why?

I love art. It’s no secret to any of the people who know me well. It’s taken me a long time to feel confident in creating and not equating how good I am – or perhaps not- at art with creativity. I think it’s the same for kids. Those who like art, often feel as though they are good at it and those who don’t like it, often feel as though they aren’t. We all have the potential to be creative and sometimes having the ability to explore different art forms, gives us the inspiration to do just that. 

Last year, I taught Art and I wanted students to have the opportunity to visit different galleries. Many were offering virtual tours of some of their exhibits which is great because it gave greater access to museums throughout the world. I tried to find different galleries that might have artifacts that may be of interest to my students and created this resource for them to have an opportunity to explore. Not only did I want them to explore, but I’m always interested in what catches their attention or pieces that they like so I thought it would be great for them to have the opportunity to reflect on their experience, an artifact, and/or museum. I also think that it’s important for them to notice and be able to communicate their thoughts or feelings about different forms of art. Hands down, many enjoyed the MET for kids because of the way in which it was presented – as a cartoon map – but there were also students who were interested in looking at sculptures. 

After hearing some of their feedback, I changed some of the reflection questions, added a few more places they could visit and also gave them a bit more room to write. I’m always grateful for students sharing their feedback with me as it helps me to be a better teacher. 

Considerations

As with all resources, please take time to review the slides and links prior to sharing this resource with students. I used this with my Grade 4/5 class and we had already built a strong classroom community where we could have conversations about the different types of art that were seen and discuss some of their cultural significance. We also had conversations prior about museums and how they “received” their collections and some of the difficulty in finding museums with online collections that weren’t sharing art that is solely eurocentric. 

Get Exploring!

Here’s the link to your own copy of the resource. Change it up. Make edits that might be better suited to the needs of your students. Google also has a wide variety of online collections from museums that you can use.  Just have fun exploring on your own or with students. Either way, I hope that you find something new that tickles your fancy. 

During the pandemic, I have fallen more and more in love with art. Consuming art. Creating art. Sharing art. I hope that as you and potentially your students explore art, you’ll have the opportunity to get creative and share what inspires you all. The last month of school is fast approaching. I do hope that you find this resource helpful and are able to use it.

Climate Change

Climate change is real and our students know it. In a very real way, they are seeing the impacts. Conversations are taking place in classrooms around the impact of our actions on the environment and students are stepping up, trying to effect change. This past weekend was Earth Hour and there were so many posts online of different commitments people were taking in hopes of tackling this very real problem. While there is no simple one act that we can take, if we all do something, we can hopefully slow its progression.

ETFO’s Climate Change Primer defines climate change as, “Extreme changes in weather patterns that are brought on by human activities such as the emission of greenhouse gases (carbon dioxide, methane) and land usage in the form of industrial agriculture”. The 2020 resource was developed to help members learn and consider how themes such as environmental racism, colonization and migration intersect with climate change. It’s a great resource for educators to learn and consider diverse perspectives, prior to engaging in conversations around climate change in the classroom. 

One theme from the Climate Change Primer was access to water, which got me thinking about the use of water in agriculture. In the past, I’ve shared infographics like this one on how much water it takes to produce different items. Students are always stunned when they realize just how much water it takes to make some of the everyday items we consume and/or use. Visuals are powerful tools to spark conversations and allow us and students to be better informed. With information, this helps us gain a deeper understanding that the items we have at our disposal, often come with a high cost to the environment. 

Excitingly, this year’s Minecraft Education Edition’s new challenge – Climate Futures: The Farm – allows students to explore the impact of agriculture on climate change. With a Teacher Guide and Powerpoint presentation, students can walk away from the experience having had discussions around the following key questions:

  1. Why is food production important to humanity?
  2. With a growing population in the world, how might agricultural practices impact the climate?
  3. What alternative ways are there to increase food production without further damage to the environment?
  4. Is there a link between deforestation, transport and agriculture? 
  5. What can we do individually, locally, nationally and globally to address the problem of mass farming and food production and its impact on the climate?

While I haven’t tried this activity with students yet this year, I know that last year’s Minecraft challenge around social justice sparked many meaningful conversations within the classroom and saw students making some commitments to action. If you give this year’s challenge a try, please let me know how it goes!

As I have stated before, climate change is real. In what ways might we inspire our students to learn and gain a deeper understanding of the actions they can take to bring about change?

So What’s Your Story?

Many moons ago I was gifted a wonderful book by a student and her family. Good Night Stories For Rebel Girls is a collection of stories about 100 extraordinary women, including beautiful illustrations from female artists. Over the years, the team at Rebel Girls has created other books. This month – being Black History Month –  I was excited to gift their book of 100 Real-Life Tales of Black Girl Magic, to a friend. In my inscription, I shared that her story also needed to be added to the book. This got me thinking about the stories that we share – particularly during Black History Month – and how we as teachers, go about sharing these stories. Often, it’s a select few well-known people whose stories we feel are worthy of highlighting for one reason or another. Within our schools and communities, I wonder how many equally incredible stories are waiting to be heard? How might the stories that we as a community learn from each others’ experiences, ultimately make our school community even better? In this post, I’m sharing a few ideas that are buzzing around in my mind.

Create Your Own Anthology

Based on the stories within this book, creating a class or school anthology is the easiest idea that comes to mind, but is also one of the hardest. I think of the incredible stories that students, school staff and community members could share about their lives and experiences. There could also be a team of illustrators or the person who is sharing their story can create their own self-portrait. There’s so much power in seeing how one views themselves. The stories within the book are short and powerful. Examples can be shared to give writers an idea of how they might choose to share their stories. 

Seems easy enough, right? But what conditions do we have to cultivate in order for people to feel comfortable in sharing their stories? If students, staff and/or members of the community don’t feel as though they are a respected part of the school community, we may never know what story they may have to tell. Further, if by chance we are privy to any part of the story of another and decide to ask for a contribution, we might in fact be causing further trauma by asking for the story to be revealed. There’s a delicate balance when it comes to the telling of stories and I firmly believe that it starts with creating spaces where people feel seen, heard and valued. Without that, creating this sort of anthology will cause more harm than good. 

The 3 Prompt Podcast

Some time ago, I shared a post on podcasts for students. In the post, I shared ideas on how podcasts could be used within the classroom and since then, I’ve shared other posts on how we’ve incorporated them in both literacy and science activities. Most of what I shared has been about fictional stories but why not have a podcast dedicated to sharing the real stories of students, staff and members of the community? Rebel Girls has its very own podcast that might spark ideas for listeners too. 

One thing that I’ve learned is that podcasts don’t need to be long. They just need to share interesting information about a specific topic and listeners will be hooked.  In podcasts, I think that the interview questions are crucial and make them flow.  Students can take turns interviewing people who are willing to share their stories, coming up with 3 prompts to guide the conversation. Interviewing is an art. Years ago, I learned about the TED method of interviewing. I’ve used it in design to understand the story of the user and that’s really the goal of this type of interview – to understand the story of another, rather than to lead. In the TED method, we use 3 sentence starters to guide the interview.

The sentence starters are simple enough to tweak into meaningful prompts once you know a little about the person you are interviewing. Yet another reason why it’s so important to build a space where people feel seen, heard and valued. 

These are just a couple of ideas stemming from these incredible books. Perhaps start by considering where you are at with building classroom or school community. Do members of this community feel seen, heard, and valued? If not, take stock of what changes need to be made by listening to stakeholders and developing a plan of how to implement change.  If so, consider how you might like to share stories. Consider whose stories often get told and whose don’t. Consider why that might be. Have discussions on how you might create – whether through writing, art, a podcast or any other method. Stories are powerful and can be inspirational. When the time is right ask, “So what’s your story?”.

Notable Black People in Canada – A Breakout

Last summer I had the privilege of working with a school around meaningful uses of technology to spark creativity with students. It was an incredible half-day session where participants had the opportunity to play and get creative themselves, all while considering how the use of tech tools could further support students in learning and creativity. 

As you probably already know, I’m an avid user of G Suite For Education Tools. For years I’ve been using Slides, Forms and Sites to create breakout rooms for students as an interesting way to deliver content and to help further develop the skills of communication and collaboration. For our session, I created a Breakout on Notable Black people in Canada. As this is Black History Month, I thought I would take the opportunity to share it here with readers. 

This Breakout is a series of puzzles designed to help people to learn about the history, experiences, and contributions of a few notable Black people in Canada: The Maroons, William Hall, Hattie Melton, Molly Johnson, and Michaëlle Jean. I had a blast building this Breakout because it gave me an excuse – if you will – to learn more about the contributions of Black people, using tools that I was already familiar with. 

While I’m not sharing the answers to the breakout here, I encourage you to take some time to learn and answer the questions prior to sharing this breakout with your students, if you so choose. You know your students best and I think that it’s always great to have rich conversations both before and after deciding to jump into any new learning. Slide #2 has some great instructions to help guide you if you are not already familiar with breakouts. Do you have what it takes to breakout?

Infographics – Hands on Learning With Technology

In my timetable this year, there are periods where I work with teachers and students around the use of technology. Excitingly, over the last month or so, I’ve had the opportunity to partner with a Grade 4 teacher, to consider the skills that would be important for students to know at this grade level. In this class, students have 1-to-1 technology and we were pretty excited to help students further develop their proficiency. Our board uses Google and we thought we would start with exploring Slides to see what students might create. 

While there are many different ways of learning to use Google Slides, we thought it would be fun for students to jump right in and play. There really is nothing like being a part of the experience, rather than watching someone tell you how to use a tool. As such, we decided to adapt a Google Scavenger Hunt that was shared online by Caitlin Tucker some time ago. While we thought we would fly through the scavenger hunt in a session or two, we realized that we really needed more time to make sure that students were able to play and discover as they were guided.  Since the Google Suite for Education Tools are so similar, we also wanted to make sure that students were able to transfer their skills from one tool to the next. Navigating from Slides to Docs, students quickly realized that the similarities in the menus in each of the tabs and the toolbar. 

Students were also learning about infographics with their teacher and once finished, they had the opportunity to create their own infographics on any topic of interest. Students learned that infographics are visuals used to easily represent information or data. They learned that they could have charts or diagrams to display information or images that would help the reader understand in a deeper way. We took some time to explore infographics found online and in magazines and quickly realized that they have key features:

  • Titles and subheadings
  • Clearly organized information 
  • Important statistics
  • Bold or bright colours are used to capture the attention of the audience
  • Graphics and images that stand out and draw the reader in

Before creating their own, we wanted students to use the Explore feature to conduct research and we also had a brief mini-lesson on how to cite information. Students quickly understood the importance of rephrasing the learning from websites but also making sure that they credit the author of the information they are using. They were so eager to start.  From Snakes to countries of family origin to cute pets and Fornite, students created some incredible infographics, helping their readers to understand the topics in a clear way. It was clear that the skills that we learned during the scavenger hunt were being put into use now when it was their turn to create. 

I’m so grateful to have had the time to collaborate with this teacher because it gave us the opportunity to sit and consider what skills we wanted students to walk away having learned and how we could facilitate the learning of these skills in a meaningful way. Pausing and supporting students in learning how to effectively use technology is so important. Moving forward, I know that I will continue to ask and consider “the why?” behind using technology and whether or not students have been supported in learning how to use the tool prior to expecting them to complete a task.

Top Ten Tips for Attending Virtual Professional Learning for Educators

So much learning is happening virtually now and it is amazing.  I recently attended a virtual EdTech Conference in Nebraska!  This is an opportunity I never would have been able to take advantage of before the pandemic.  I have attended a number of virtual conferences during COVID and I’ve also organized and facilitated virtual learning over the last year and it is a different way to get your learn on!

In order to really get the most out of Virtual Professional Learning here are my go-to suggestions:

  1.  Organize your time and your conference selections in advance.  If there are many choices, take the time to do the research on the session and on the presenter. If there are digital links for presentations on the conference site to add into a digital tote-do it before your sessions so that you aren’t tempted to leave the session in order to do so.  Thank you ISTE LIVE 21  for the digital tote feature!
  2. Be PRESENT.  Be mindful and intentional about your learning.  If it isn’t the kind of learning that you were expecting, hop over to another session otherwise you’ll be resentful of wasted time and learning.
  3. Put your “out of office” email message on and don’t check your email.  If you were in an in-person setting, checking your email would be rude. This is time for your learning so treasure and protect that time.
  4. When possible attend LIVE sessions not asynchronous or previously recorded sessions.  LIVE sessions have opportunities to engage and ask questions which makes the learning is deeper.
  5. Have a PLP (Professional Learning Partner) or two! No one really wants to go to a conference by themselves. Some of the best learning takes place when you share what you learned in a session that your PLP wasn’t able to attend! You double the learning!
  6. Participate in the learning.  If there is a chat feature then put who you are and where you are from in the chat.  Ask questions, engage and connect.  This is where you grow your Professional Learning Network.  In a face to face conference you would sit down and meet new people.  Think of how you would engage with others in a real conference setting.
  7. TWEET! TWEET!  Get the conference hashtag, follow it, retweet and tweet about your learning and the presenters.  Follow those presenters and give them a shoutout. Take a picture of the slide that they are sharing and post it (without people’s faces and names in it.)  It is awesome as a facilitator to see the tweets afterwards.  It is timely feedback and motivational for the presenter.
  8. Take notes.  My PLPs and I recently collaborated on note taking using a Google Slide deck while attending a conference.  We pasted links, took screenshots and put notes of important information into the slide deck so we have the learning for later.
  9. Participate.  As a presenter, it isn’t nice to present to the empty boxes on Zoom or Webex. Just as in person, it is nice to see the reaction of the audience to pace yourself and to know that they are still with you! That being said, if you are eating or dealing with your dog or family or have decided to multi-task, leaving your camera on can be distracting for the participants and the presenter.  If there is a question asked in the chat, respond! There is nothing like being a presenter left hanging.  If there is a poll, a word cloud, a Jamboard,or a Kahoot, play along! The presenter created these things in order to make the presentation interactive for the adult learner.
  10.  Take Breaks.  Make sure you look carefully at the schedule (and the time zone) in order to plan your screen, water, coffee, bathroom, movement or snack breaks.

The most important thing to remember is that the presenters put time and effort to share their learning and expertise with you.  It is nerve-wracking to present to a group of educators.  Tech savvy people have tech issues too.  Give presenters grace and remember to thank them and provide feedback for their work and expertise.  They will appreciate it!


Decorative: Minecraft scene

A Reflection on a Year of Minecraft: Education Edition

It’s June tomorrow! How is it already June? This year has somehow been both the longest and the shortest year of my teaching career. It’s been a bit of a slog in many ways, so I’ve been thankful for little moments of joy that I have shared with the students in my class over the year.

One of our great joys this year has been Minecraft. I’ve talked about it before, but I wanted to give a little update on our village and the overall pros and cons of using Minecraft in the classroom.


A Village Update

We have been working on the village off and on, primarily as a “when you’ve finished your work, you can do this if you want” option, for most of the year. If you’re not familiar with the village, we used a “Starter Town” template from the Minecraft library. It has the infrastructure already set up and you populate it with buildings. We started with students creating their own houses in numbered spaces set aside for this purpose. As you can see, we had a wide variety of styles and building heights.

Many houses have rooftop hot tubs. They are obsessed with the idea of hot tubs.

I will say that in hindsight, this template doesn’t really allow for much sidewalk space between buildings. I appreciated the smaller spaces (the building area is about 10×10) because it forced students to confront design challenges and adapt their plans, but the sidewalks themselves made it feel oppressive and crowded to walk at ground level. I think it would’ve been better to use wider sidewalks.

From there, students started adding all kinds of buildings – a hotel, a pet store, the Merry Dairy (a great ice cream shop in Ottawa), a leaf daycare (it’s a long story, don’t ask)…

There didn’t seem to be an end to their creativity. Some students created a zoo.

Others created an elaborate underground network of tunnels that would lead between buildings. Then, different houses started to appear – rogue houses! Without building permits! 

The builds got even more egregiously out of line with our Super Strict Community Planning: an entire village appeared just outside of the town, complete with blacksmith.

It was really cool to watch them create new things in the world and think outside the box.


Reflection on a Year of Minecraft

So… after a year of using this game in class, what do I think? Overall, I’ve been happy with what students have been able to do in the game. They’ve come up with some really cool ways to demonstrate their learning. They show far more perseverance when working through problems in Minecraft than they do at any other time. It’s also been great for collaboration in a year when opportunities to work with other students have been pretty minimal.

This isn’t to say there have been NO issues. We’ve definitely encountered some problems with outdated tech in schools where certain devices can’t be used for the game. During online learning, it’s been really difficult to troubleshoot problems with students. Some students don’t have compatible devices at home, either. 

Then there’s the in-game problems we’ve had, of which I’ll name a few here:

  • Spawning hundreds of animals in town.
  • Using commands incorrectly.
  • Harassing other students with commands.
  • Flooding the town.
  • Burning things down with lava.

I mean, most of those can be solved by students becoming more familiar with Minecraft, but it’s been an adventure.


Pros

  • Develops students’ critical and creative thinking skills.
  • Strong cross-curricular opportunities.
  • Can be used for short-term or long-term projects.
  • Tons of premade worlds, lesson plans, and activities in the library.
  • Strong buy-in from students.
  • Can be used in multiple languages.
  • Fosters perseverance.
  • Allows students to take on leadership roles by sharing their knowledge with peers.
  • Collaboration between classes!
  • In-game tutorials for students who are new to Minecraft.


Cons

  • Have to have the right devices to make it work.
  • If doing a whole-class collaborative project, one device has to host the world for everyone (and should be reasonably powerful – even my gaming PC crashes when I have 15+ students in our very large village world).
  • Some students are easily distracted by the game itself and don’t always complete objectives.
  • Updates to the game can lead to network issues at school.
  • Students accidentally break other students’ work, especially when first learning.
  • Very rarely, gamebreaking bugs happen that mean a student may have to restart their work or can no longer access a shared world.


Advice for Starting Minecraft in the Classroom

  • Give students time to play. They will 100% be distracted and unfocused the first few times you use it and will not get much accomplished.
  • Use the in-game tutorials to show students how to interact and play in the world.
  • Be very clear about your objectives and goals.
  • Give students the opportunity to share what they’ve made with their peers.
  • Be patient. Everything in Minecraft takes longer. Help your students plan their projects so that they don’t become overwhelmed by the scale of what they want to do.
  • A little goes a long way. Take breaks from Minecraft, too, so that students don’t get burned out on it.
  • Allocate time for potential issues. Become familiar with the game yourself so that you can help with common problems. You don’t have to be an expert, but you should know some basic commands (how to teleport, for example).


I’m really pleased that my board will be continuing with Minecraft: Education Edition next year. I’m looking forward to working on some new plans for next year over the summer. If you try it out, I’d love to see what you do with it!

Grade 4/5 Science in Minecraft: Education Edition

My students and I have really been enjoying exploring how we can use Minecraft: Education Edition to extend our learning. Last month, before we got sent back to the world of online learning, we spent some time diving into a Science task in class.

The basic premise of the task was similar between the two grades: research a topic and build a model of it within Minecraft. Grade 4 students would be choosing one of the animals from Minecraft and creating a viable habitat for that animal in the game, while Grade 5 students would be choosing a human organ system and creating a pathway that would bring visitors through the functions of that organ system. After building their model, they then presented their worlds to the class and talked about the different elements they included.

For Grade 4, they had to consider food chains, predators and prey, appropriate shelter, biomes.

For Grade 5, they had to consider which organs were part of the system, how they’d create them in the game, what their function is and how to show that with a path or railway.

I’ll admit that I wasn’t sure how it would go when we started down this road. I considered that it might be a bit to out there as far as projects go. I should know better by now than to question these kids, though – they dove into this project with excitement and went well beyond my expectations. They enjoyed them so much that today they asked me if they could do another project like this. I’ve never had French Immersion students so willing to do an oral presentation!

Here are a few of their projects that I’d like to share.
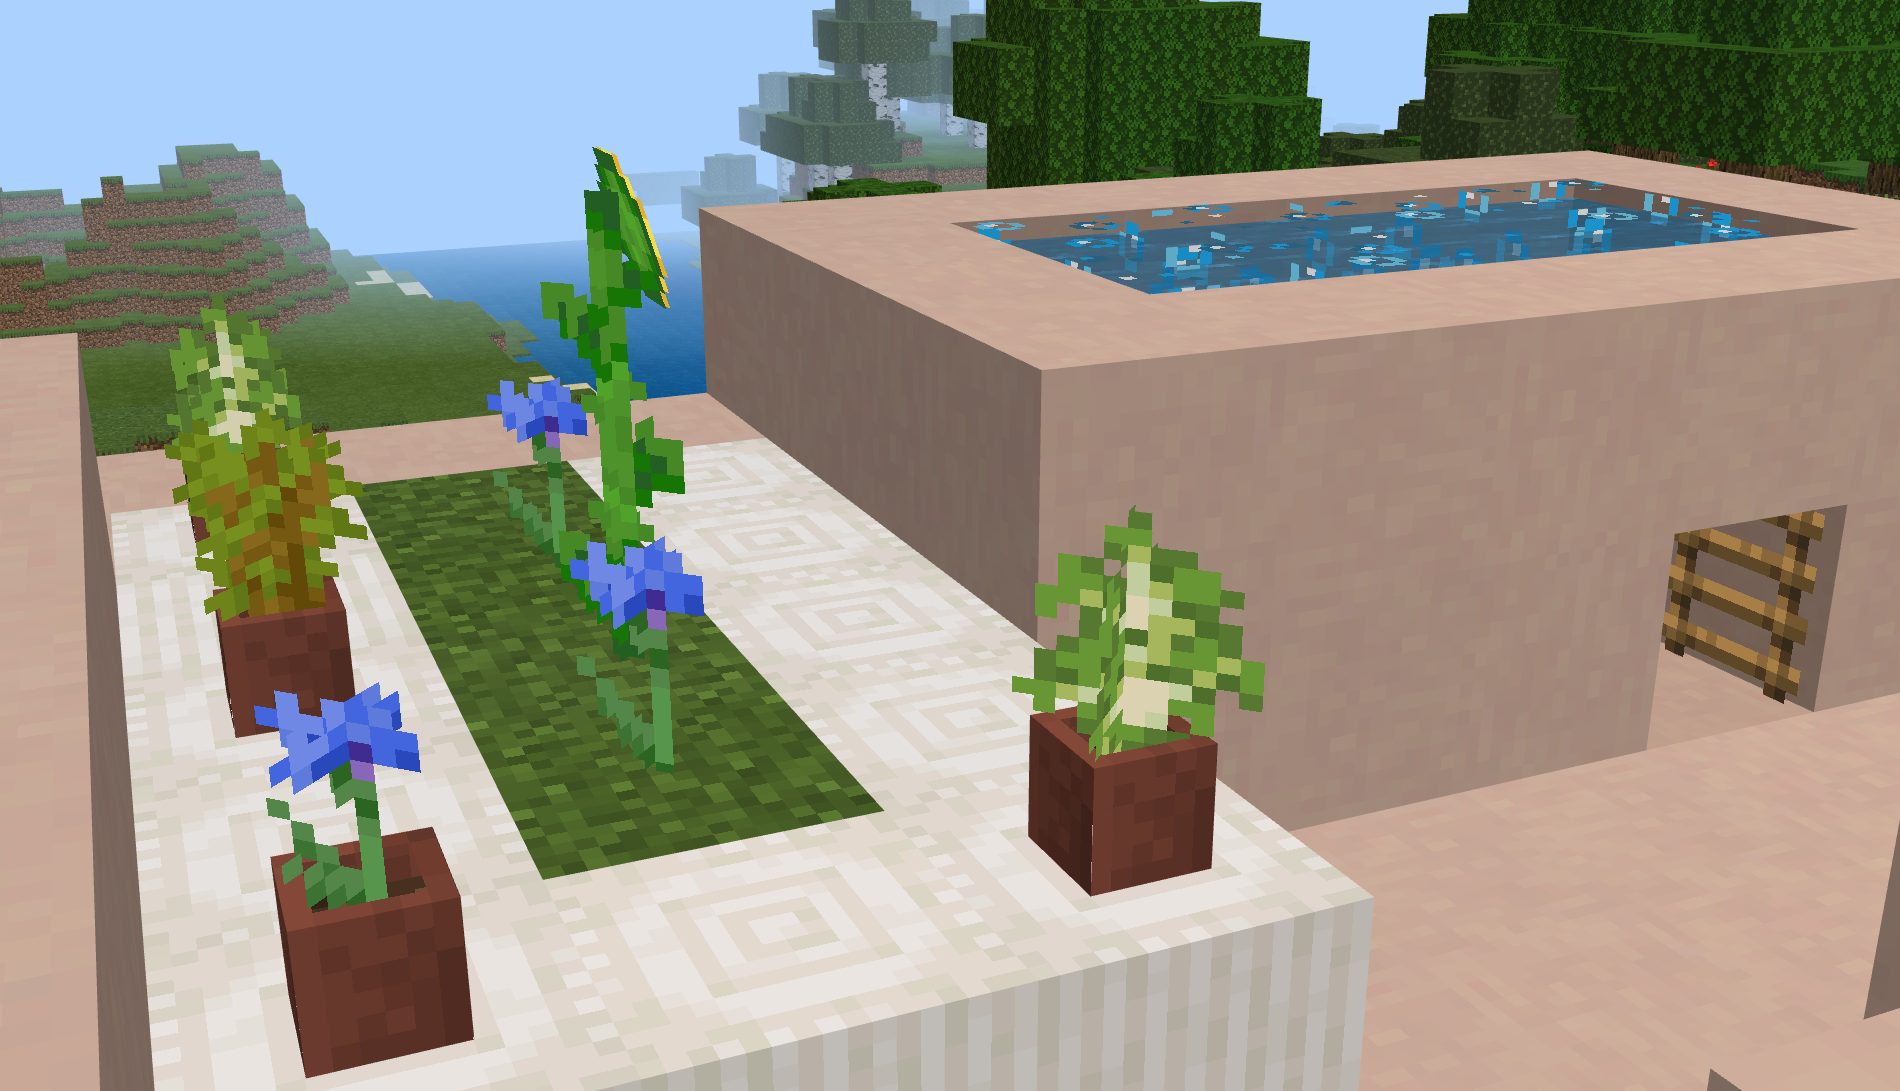
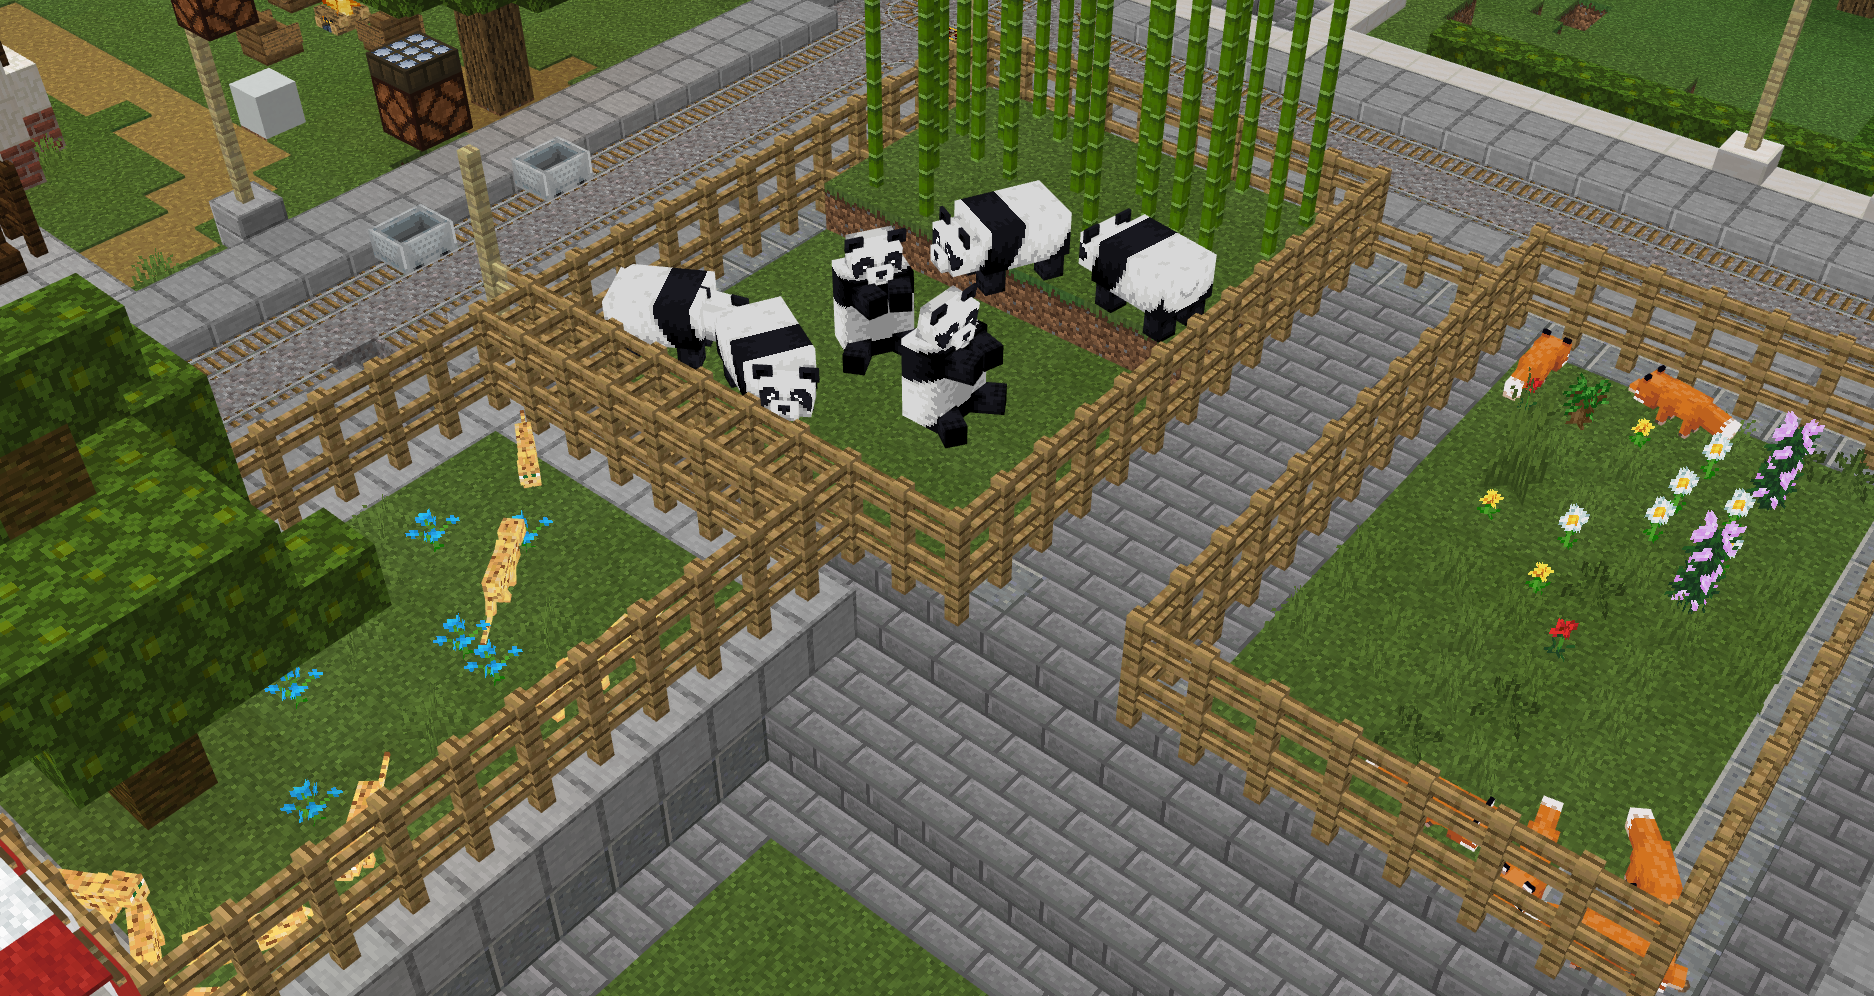
Grade 4 Habitats


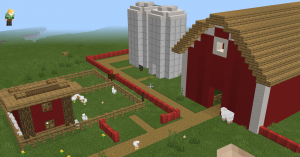
A farm habitat. The students who made this farm talked about the influence of human activity on the animals who live on the farm. There was a food chain demonstration around the side of the barn, with little pens containing different living things set up to walk visitors through the food chain.


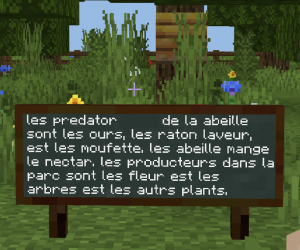
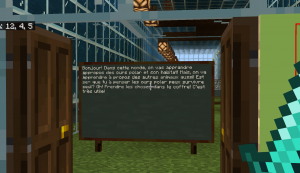
This project was on bees. The students created a park with several wildflower gardens. When you look at the level of French on these signs, consider that I teach middle immersion, meaning this is their first year in French Immersion – and for the student who did this project, it was their first year learning French at all!

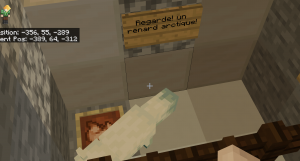
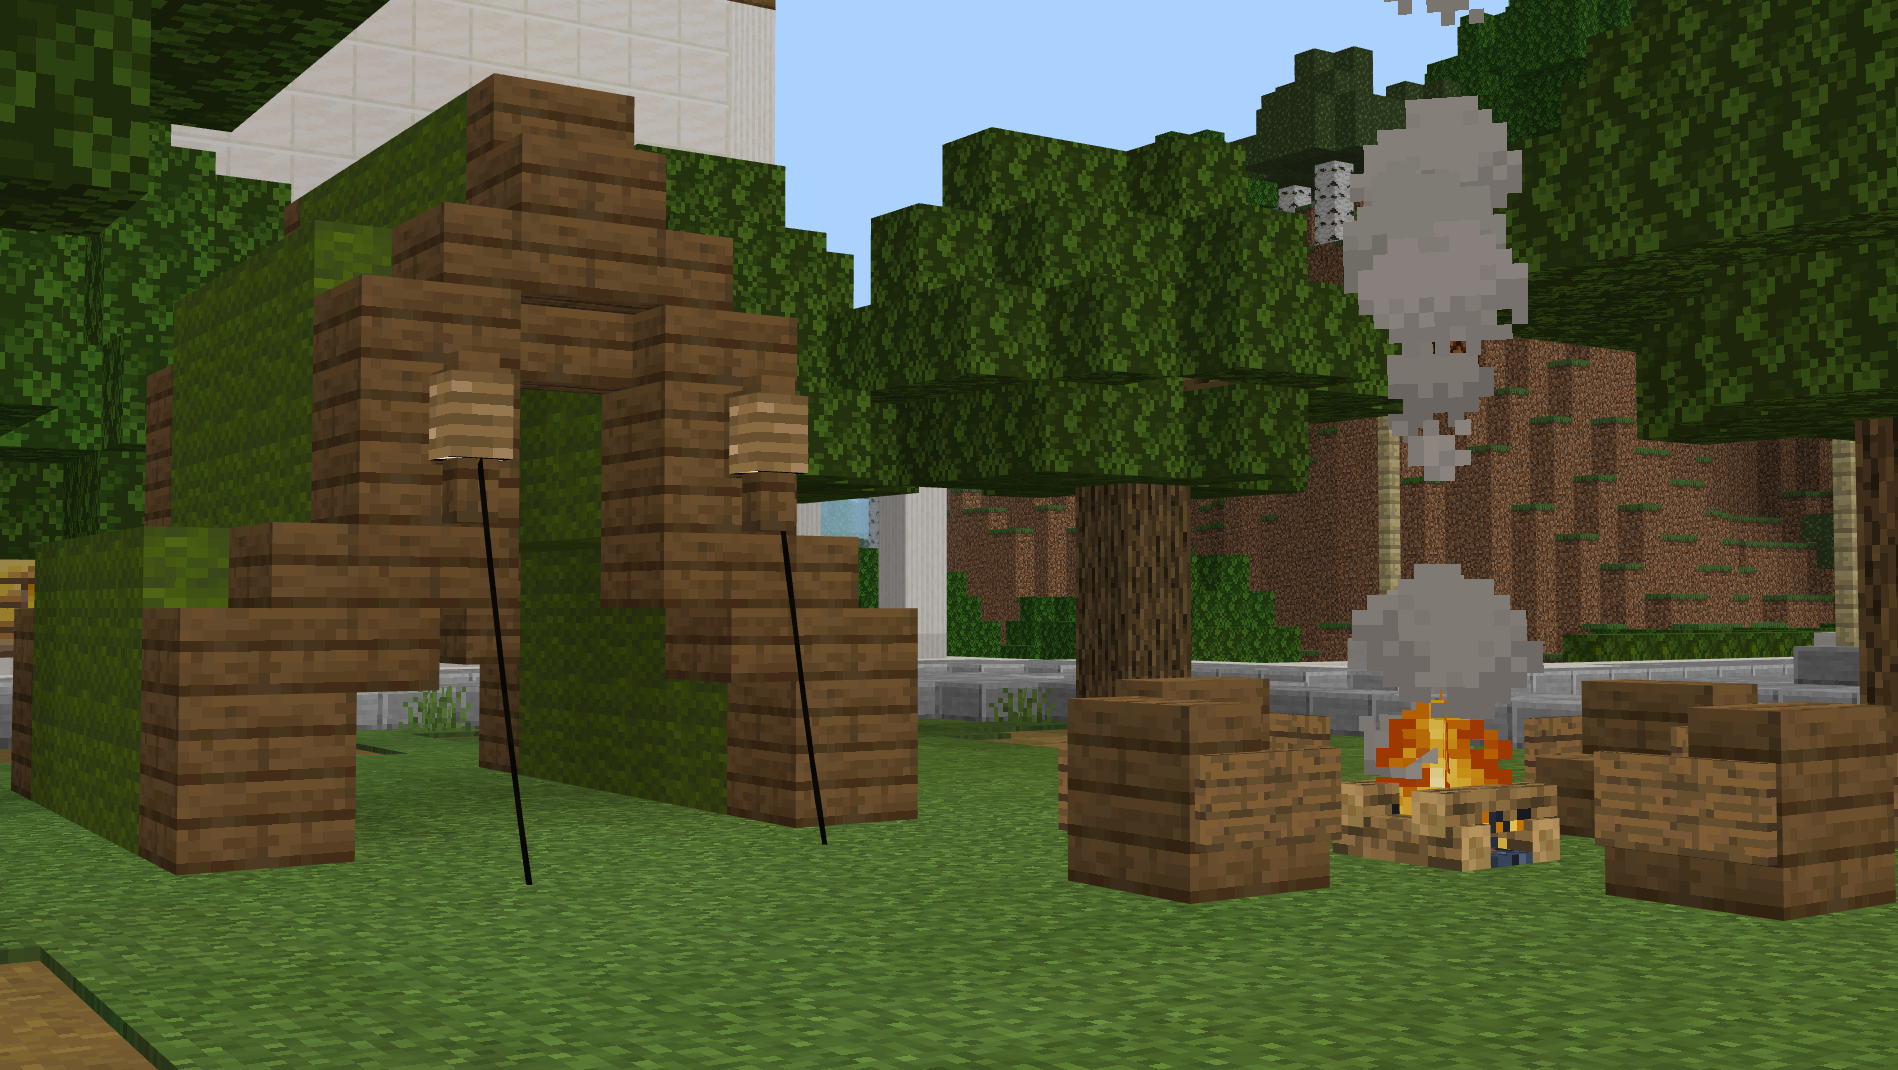
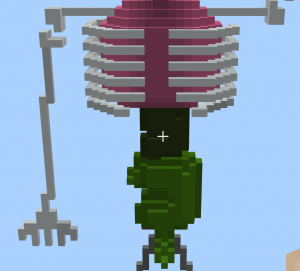
I loved how creative they got with showing what the animals eat. In this project, which was set up to resemble an artificial arctic fox habitat in a zoo, a student put an item frame on the ground and put raw chicken into the frame, making it look as though this arctic fox had been fed by caretakers.

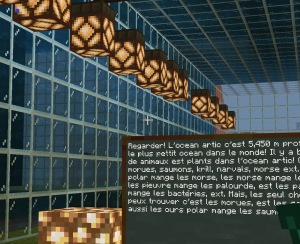
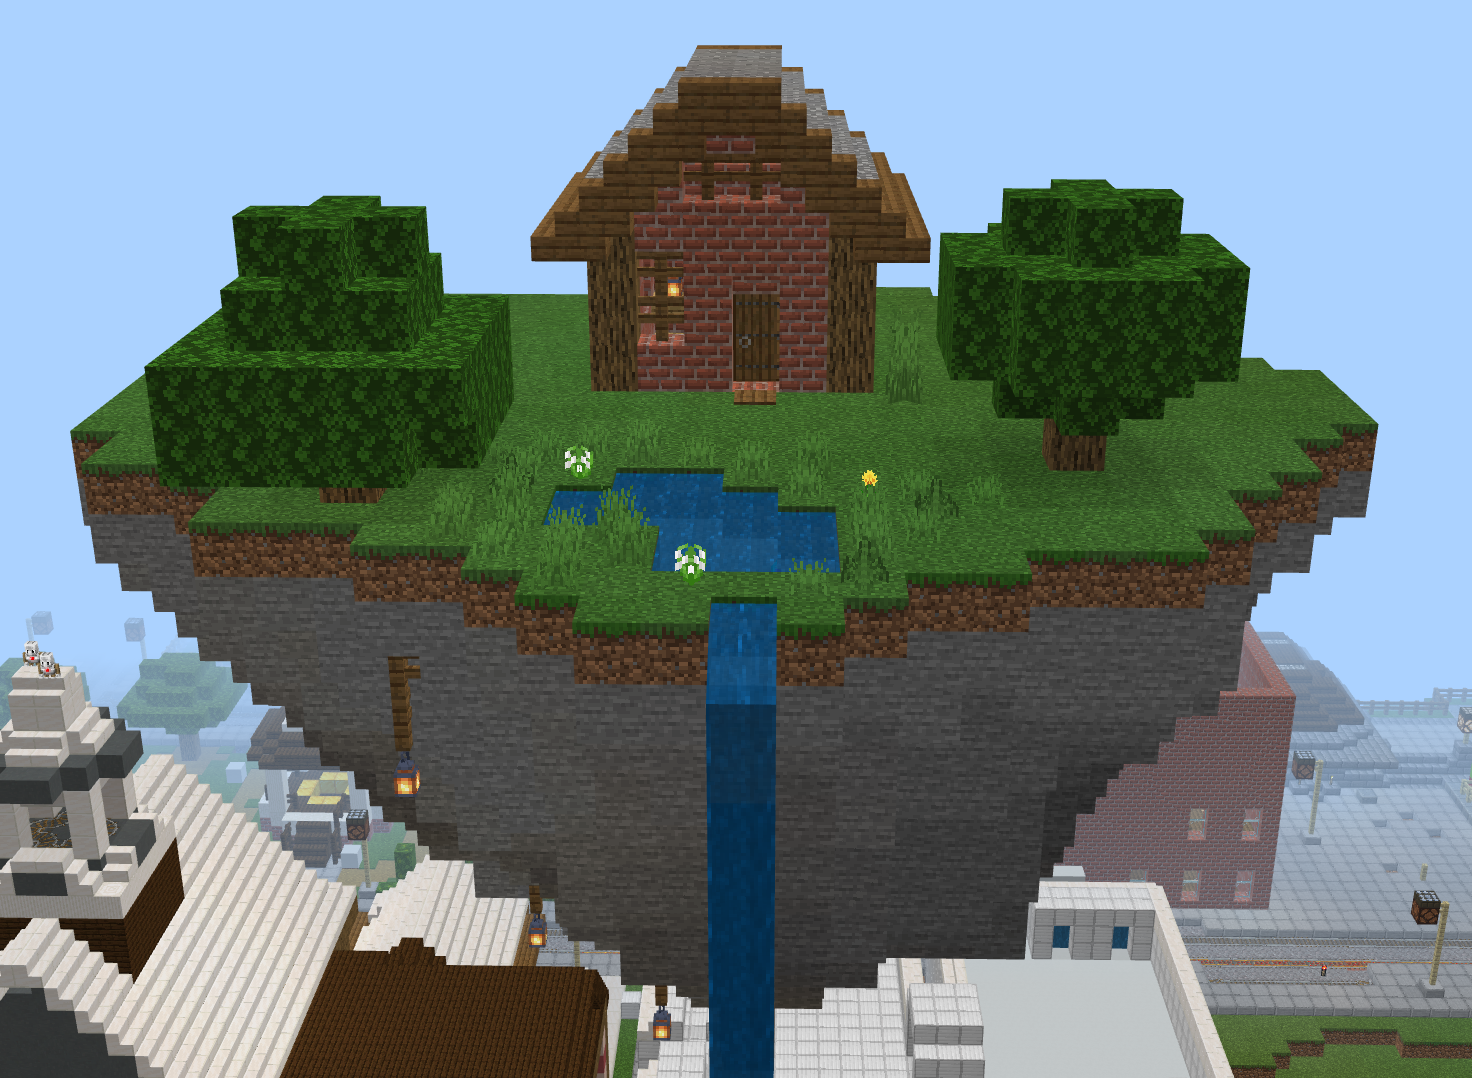
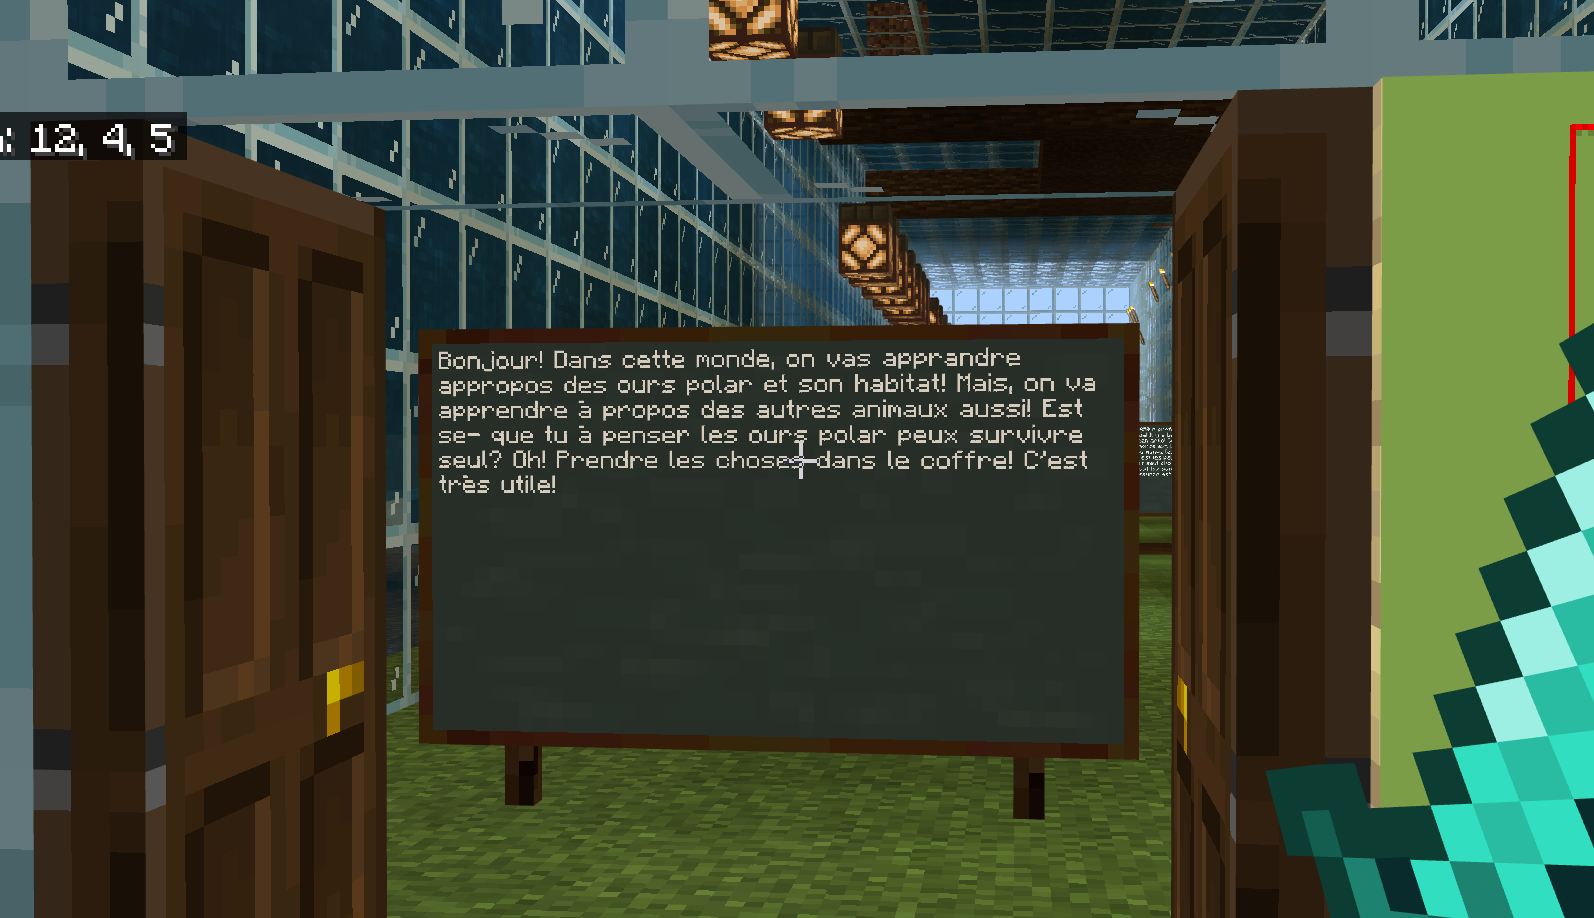
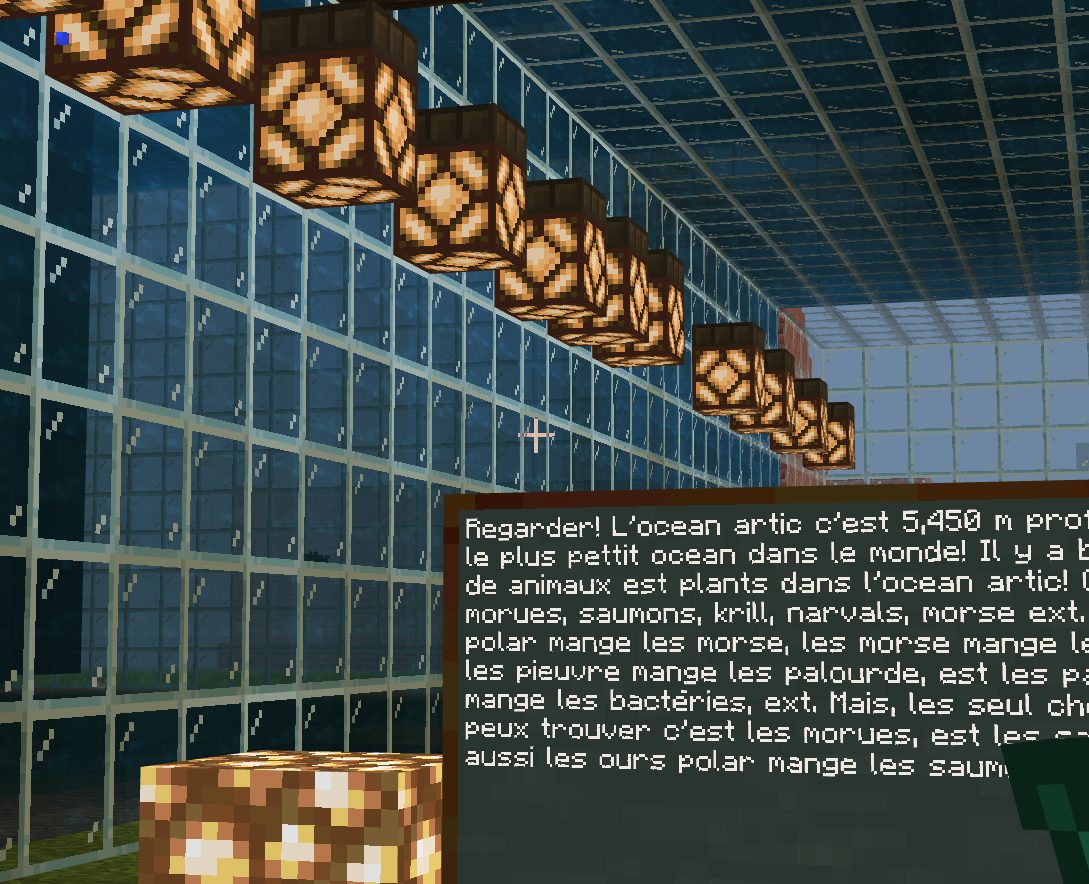
This project was extremely cool. The students wanted to show that a polar bear’s habitat includes both land and ocean. They created a glass tunnel that you could walk through, seeing into an ocean full of fish. In the tunnel, there was a point where you could drop into the water and swim out into the ocean, eventually surfacing in a polar biome where you could see polar bears on land.


Grade 5 Human Organ Systems

Sadly, I don’t have many images of the grade five projects, in part because some of them took a long time to complete and we didn’t have a chance to grab screenshots before we all wound up in online learning! I do have this one really great project, though:

The Digestive System! For this project, you would start in front of a command block that was set to teleport you inside of a mouth full of teeth. Signs on the walls would explain where you were and what part of digestion happens in that area. Then, you’d follow the path down through the esophagus…

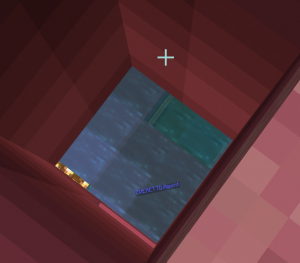
If you looked down through the esophagus, you could see liquid below – the stomach! You could then travel from the stomach through the digestive system until, eventually, you would drop out of the human body and into a (fake) toilet.

Another project took us through the nervous system. You started your journey in a minecart at the nose, where you would pick up a piece of paper meant to be a ‘message’ for the brain to tell it that the model’s nose was itchy. You’d hop in a minecart and travel to the brain, which would exchange your sheet of paper for a new message – instructions for the hand to scratch the model’s nose.

The grade 5 projects were a bit more difficult for them to wrap their heads around, admittedly. Still, they persevered and found some very cool ways to show us how human organ systems work.


Other projects we’ve taken on in Minecraft: Education Edition so far:

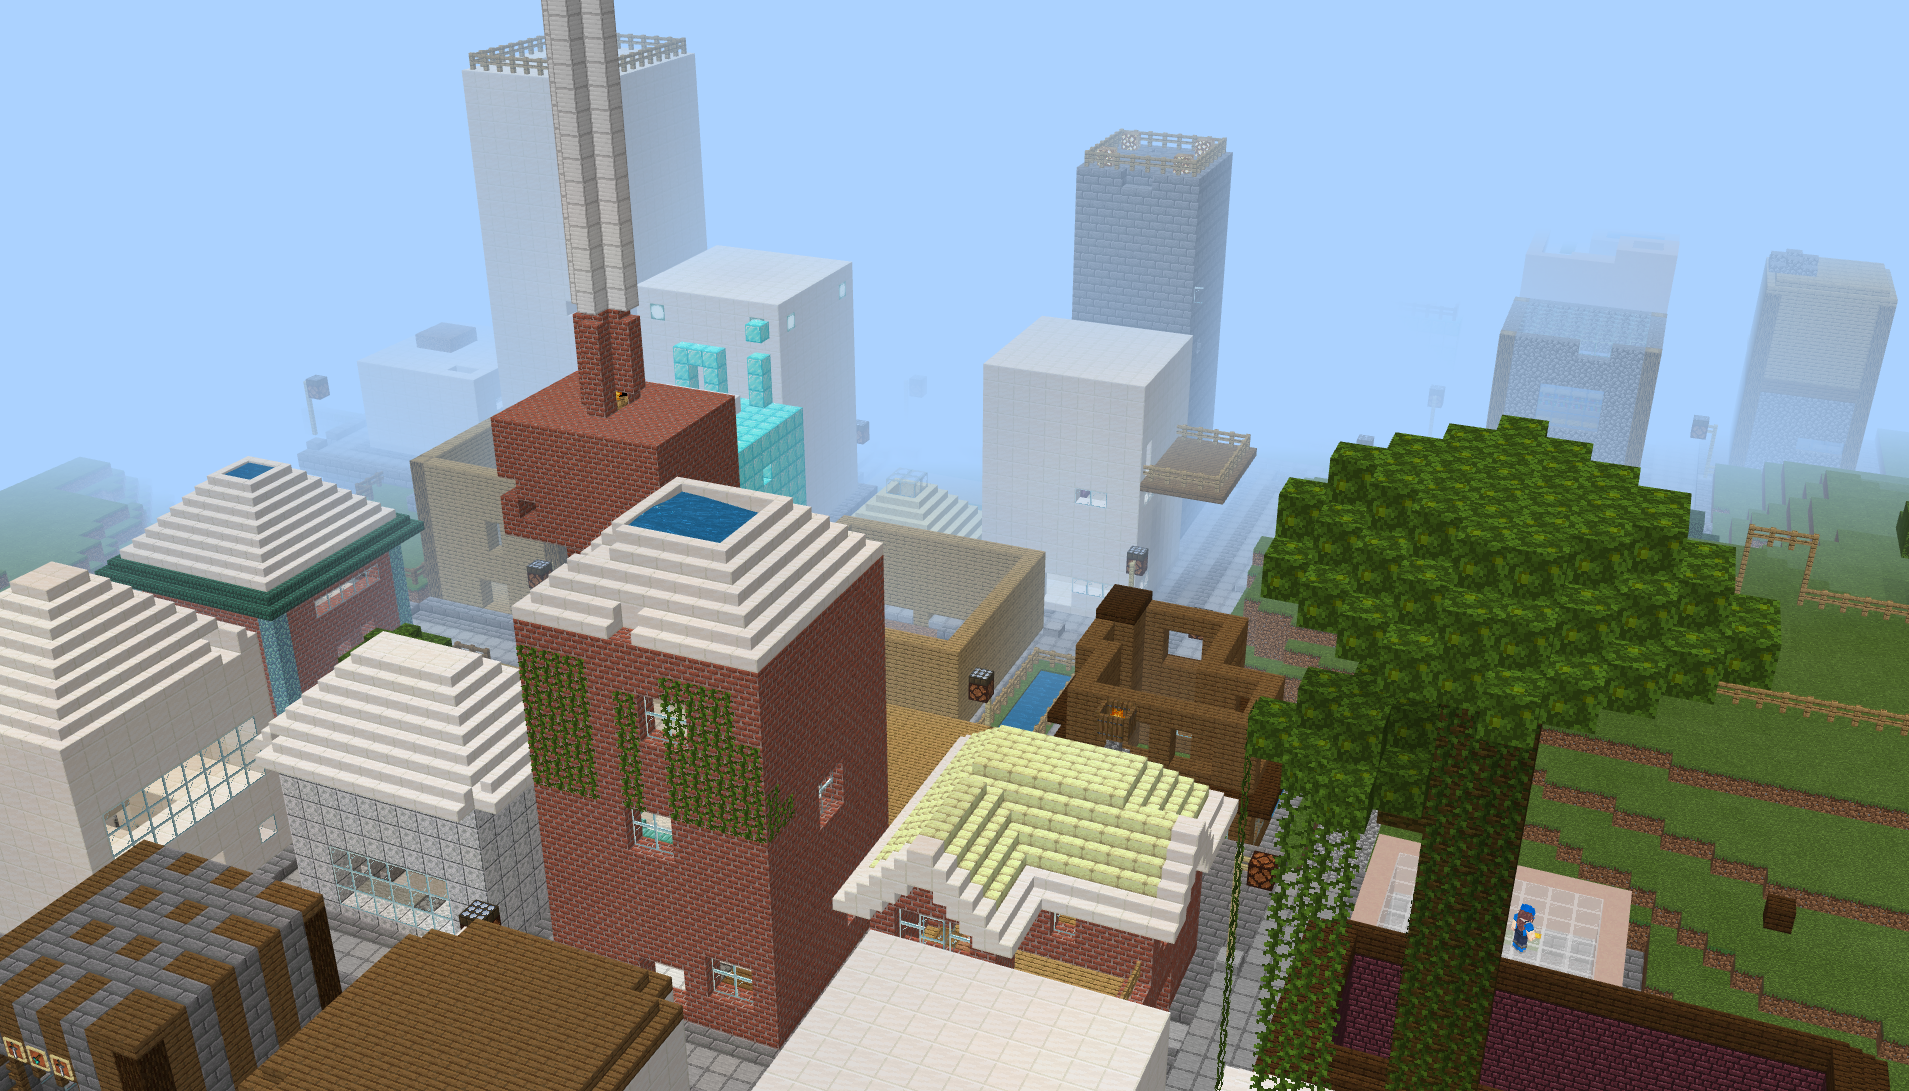
  • Building a class “town” where each student has a house, plus students are creating important community buildings like a school, a hospital, an apartment building, recreational facilities.
  • Retelling a fairy tale’s important events and places using NPCs.
  • Exploring an Anishinaabe community.
  • Doing a construction challenge with limited resources to learn about environmental impacts of human activity.
  • Regular old Minecraft fun. 😉


Hope you enjoyed this little tour of Minecraft in my classroom. I’m always happy to share more and talk about any of these projects. Now, onto my weekend planning, where I need to figure out how we’re going to use Minecraft: EE in our classroom next week!

Technology Like in the Real World

This past February, I was honoured to be asked to present at ETFO’s Technology Conference for French as a Second Language(FSL). It was a great day of hands-on learning with educators across the province sharing ways in which to engage FSL students in learning the language, using technology, whether in the classroom or online. My presentation was geared towards providing teachers with ideas to support students in moving from consumers of tech to creators. During this session, I shared a variety of ideas that were shared with me over the years and that I found engaging for students. In this post, I’ll share 3 Google Tools that you might be able to incorporate in your FSL Classrooms. 

Jamboard

The Google Jamboard app is a digital whiteboard that offers a rich collaborative experience for students. I’ve used Jamboard for check-ins, brainstorming, listening and drawing activities, and more. One example of a listening and drawing activity comes from Chrystal Hoe who is an educator in the United States. Given their own frame in the Jam, students listen to instructions on how to draw their own monster and use the tools in Jamboard to draw. Through labeling the parts of the body, students are also able to demonstrate understanding of new and familiar vocabulary as well as spelling. When finished, each student has the opportunity to view the work of their peers, revealing that even though the instructions may have been the same, drawings may vary.  

Slides

Google Slides is an online presentation app that lets you create and format presentations and work with others in real-time. With creative templates from Slidesmania and Slides Carnival, the possibilities are endless when creating exciting presentations. During my session, I shared the template for Sylvia Duckworth’s Choose Your Own Adventure Stories. Not only does Sylvia offer an example of a story, but she also gives a template to help writers organize the choices readers can make and how to include them on the correct slide in the Google Slides Template. Sylvia’s layout of the planner is clear and easy to follow. In my morning session, one participant completed their outline and was excited to share their story with the rest of us and the potential to share the activity with her students. 

Drawings

Google Drawings is the ultimate blank canvas. I’ve used it with students to create images, posters, infographics, timelines, and bioglyphs.  Simply put, bioglyphs are a symbolic representation of something in your life. Your collection of bioglyphs tells your life’s story without words. During our session, participants had the opportunity to use Google Drawings to complete their own bioglyph using instructions

Technology is an incredible tool that can be used to increase engagement while learning. These tools can be used in a variety of ways and I hope that this post helped spark some ideas of how you might be able to help students create, using tech.